

When you set up a business website or blog, the primary goal is to attract visitors and, hopefully, have them convert into paying customers further down the line.
Google Analytics (GA) allows you to measure the metrics behind these goals, as well as provide a wealth of other valuable data. This information can significantly influence your marketing strategies and decision-making process.
If you’re new to Google Analytics and unsure of how to set it up for your site, this post is for you. Follow our step-by-step guide to setting up Google Analytics correctly in 5 simple steps!
Why it’s Crucial to Set Up Google Analytics Correctly
If you’re basing key business and marketing decisions on your GA data (as many organizations do), then the consequences of inaccurate or misleading source data due to a setup error could be disastrous.
The challenge for many is that it can be difficult to spot setup errors once you’ve started collecting data. There are numerous examples of webmasters accidentally placing two tracking codes on a page, for instance, resulting in numbers being reported twice and strategies being applied under false pretenses.
Unless you are also monitoring traffic through other external sources, such as Semrush, it can be difficult to know that something is amiss in the first place.
And even then, recalibrating your entire GA setup and trying to make sense of your now-tainted historic data can be a time-consuming predicament.
GA is a very powerful data collection and analysis tool that can provide potentially game-changing insights. However, given its complexity, this also means that a lot of things can easily go wrong.
That’s why it’s so crucial that you get the setup correct from the start!
Things to Consider Before You Set Up Google Analytics
Before you dive into the actual technical process of setting up GA on your site, there are a few things to consider. Specifically, you will need to take into account which version you are going to use, and if you are going to do things manually or not.
Universal Analytics or Google Analytics 4?
There are actually two versions of GA:
Universal Analytics (UA) — the “legacy” version of GA Google Analytics 4 (GA4) — a newer iteration of the toolDuring the setup process, you’ll be automatically prompted (and, indeed, advised) by Google to create a GA4 property (more on what that means later). However, the UA vs. GA4 debate is still a rather sensitive one in digital marketing circles, so Google still allows users to create UA properties if they wish.
So, what does that mean for your setup?
If you’re new to GA, then it’s recommended to follow Google’s advice and use GA4. That said, if you have used UA previously and would prefer to stick with what you know, then that’s fine too.
But before making that decision, it’s important to understand that:
Unlike UA, GA4 allows you to collect and measure data for websites and apps within the same property. In GA4, page views (as well as all other metrics) are measured as “events.” This doesn’t mean they are not measured; it just means that they are measured differently. GA4 offers free unlimited data collection, whereas UA is restricted. If your site attracts a lot of traffic (or you anticipate that it will in the future), this could be a potential issue. GA4 also offers several advanced free features that are only available on the paid version of UA, which may come in handy further down the line.Should You Use a Plugin?
If you’re using an external content management system (CMS) such as WordPress or Drupal, then it’s possible to set up Google Analytics using a plugin or a module. This can be an appealing option for bloggers who simply want to get their site up and running as quickly as possible, with minimum technical input.
However, many of these plugins can often come with restrictions. For example, Monster Insights — one of the most popular and reputable GA plugins on WordPress — only supports UA properties (again, more on this later), meaning that you won’t be able to track app data using GA4, for instance.
It’s also worth noting that the free versions of these kinds of plugins are often targeted at blogging “newbies". If you’re planning to scale the size and reach of your website, this will eventually require deeper levels of analysis and insight.
As a result, relying on a free plugin could cause some friction further down the line. Monster Insights, for example, can cost anywhere between $99 and $799 per year once you go beyond the free version.
While plugins can take on some of the heavy-lifting of adding GA to your site, there’s a lot to be said for learning how to set up GA manually. You’ll likely get more out of the tool, and it can save you money in the long run, too.
How to Set Up Google Analytics in 5 Steps
With some of those considerations covered, let’s dive into how to set up Google Analytics and manually add it to your site.
Step #1: Create Your Google Analytics Account
Your GA account is how you’ll administer and manage your GA activities. However, before you can set one up, you’ll first need to sign in to your regular Google account (e.g. the account you use to access your Gmail, etc.). If you don’t yet have a Google account, you will need to create one.
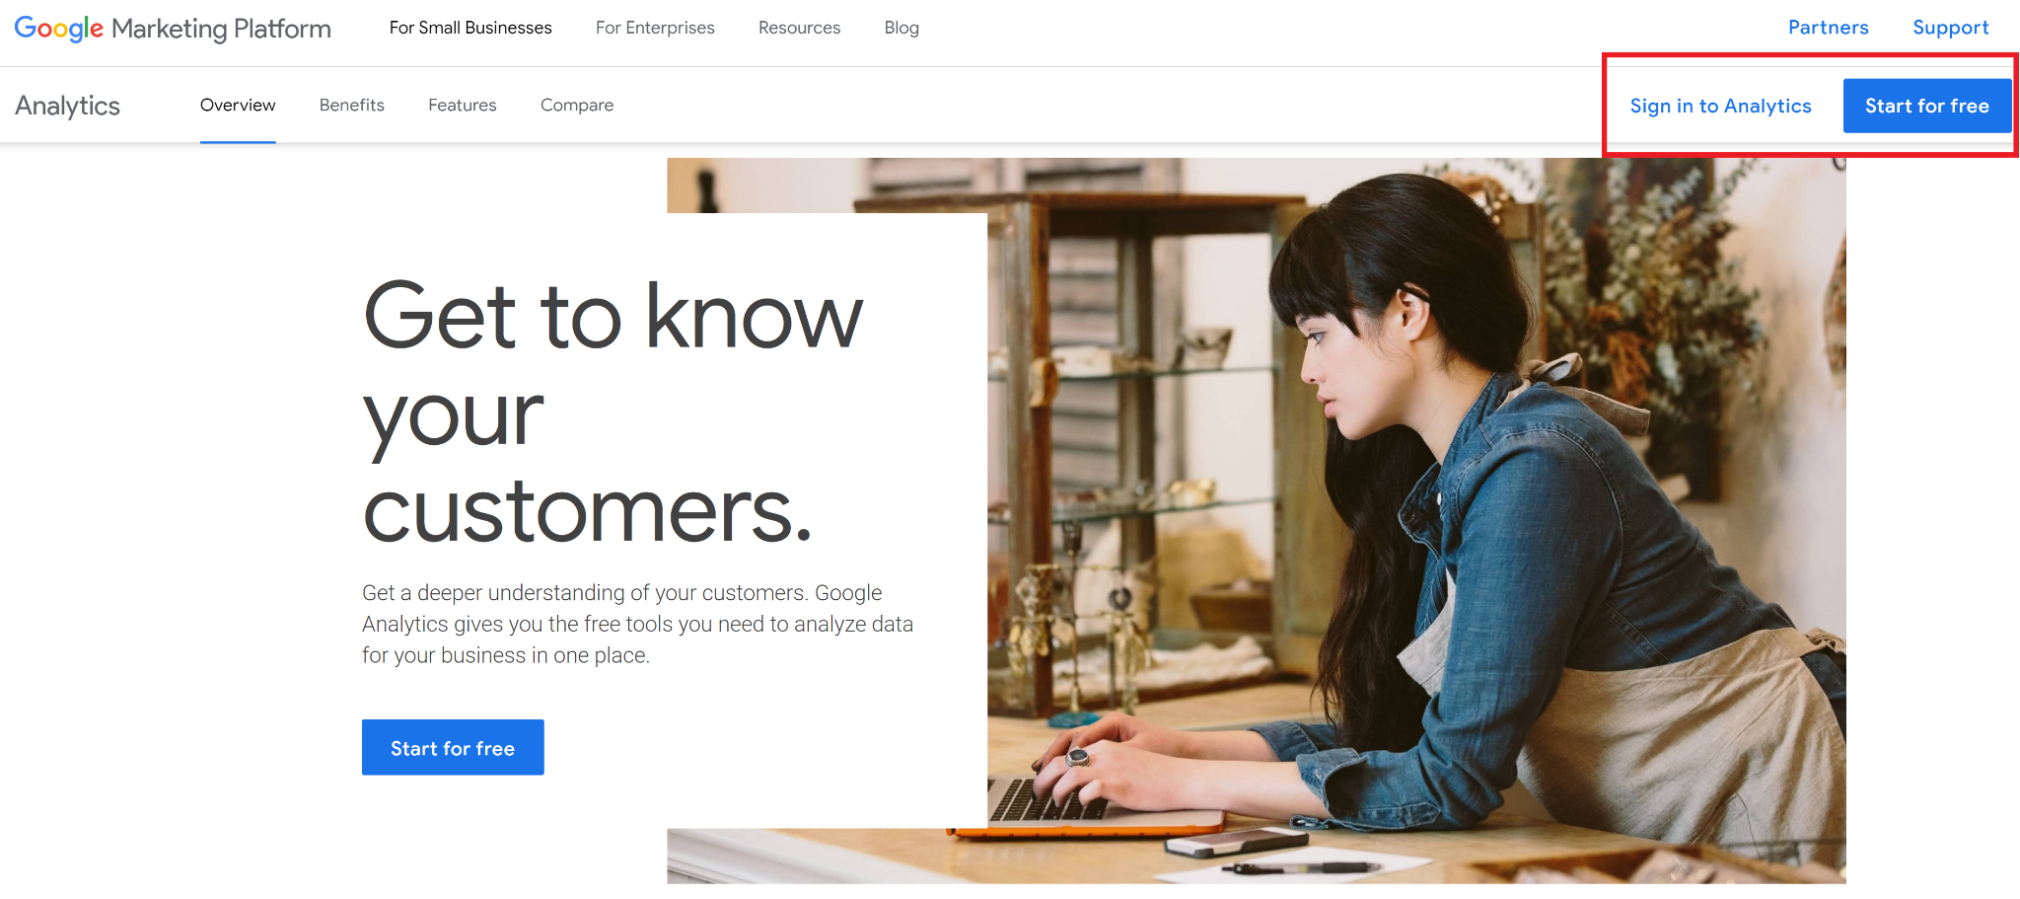
Once you are logged into your Google Account, go to the Google Analytics homepage and select “Start for free” in the top right-hand corner.
You will be taken to the account creation page where you will be asked to complete the following three sections:
1. Naming the Account
For this section, note that you need to give an account name, not a property name (which is covered in the next subsection). Therefore, you shouldn’t enter the actual domain URL here.
Your account name can, of course, be whatever you want, but it’s advisable to choose something simple, such as the name of your company. If you’ll be creating several accounts for several domains (or subdomains), it’s a good idea to differentiate them for simplicity (although this isn’t compulsory, as each account has its own unique ID).
For example, if you own an ecommerce store that has subdomains for different regions (i.e. paulsguitars.co.uk for the UK, and paulsguitars.com for the US), then you could name them Paul’s Guitars (UK), and Paul’s Guitars (US) respectively.
At this point, you will also be prompted to set your data sharing preferences, which covers what Google does with the data you collect. Ensure that you read through these policies, and only select the options that you are comfortable with.
2. Enter Your Property Details
Next, you need to define your property. In Google Analytics, a “property” can refer to any online asset you own, such as a website (www.yourshop.com), a blog (blog.yourshop.com), or an app. What’s important to note here is that your GA4 account can be associated with more than one of these properties.
For example, let’s say that you want to track everything — your site, your blog, and your app — under one account. In this case, you would set your property name as “yourshop.com” (i.e. the parent domain).
However, if you only wanted to track one of these properties, such as your blog, you would opt for “blog.yourshop.com”.
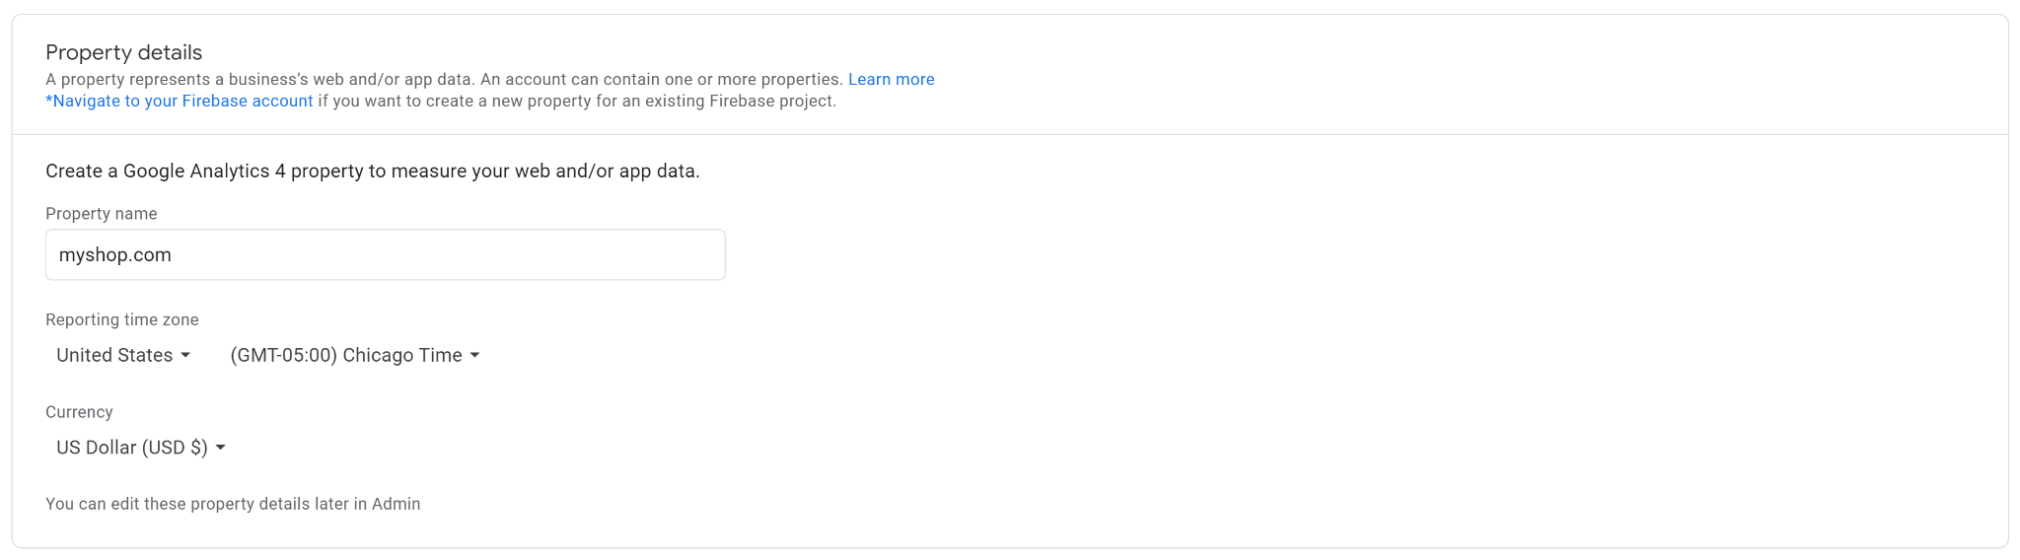
You will also be asked to set your desired time zone and currency (these can be changed later if needed).
Note: In this section, you are automatically prompted to create a GA4 property. However, you also have the advanced option to change this and create a UA property, although Google does not recommend this.
For simplicity, the remainder of this article covers the setup steps for those who’ve selected the GA4 property option in this section.
3. Enter Your Business Information
The final GA account setup step is to provide some straightforward details about your business, including:
Your industry (e.g. shopping, finance, sports, etc.) Business size (by number of employees) Your intent (i.e. what you plan to use Google Analytics for)
Once complete, click the “Create” button. You will be asked to read and accept Google Analytics’ terms of service, and then arrive at your GA dashboard.
Step #2: Set Up Your Data Stream
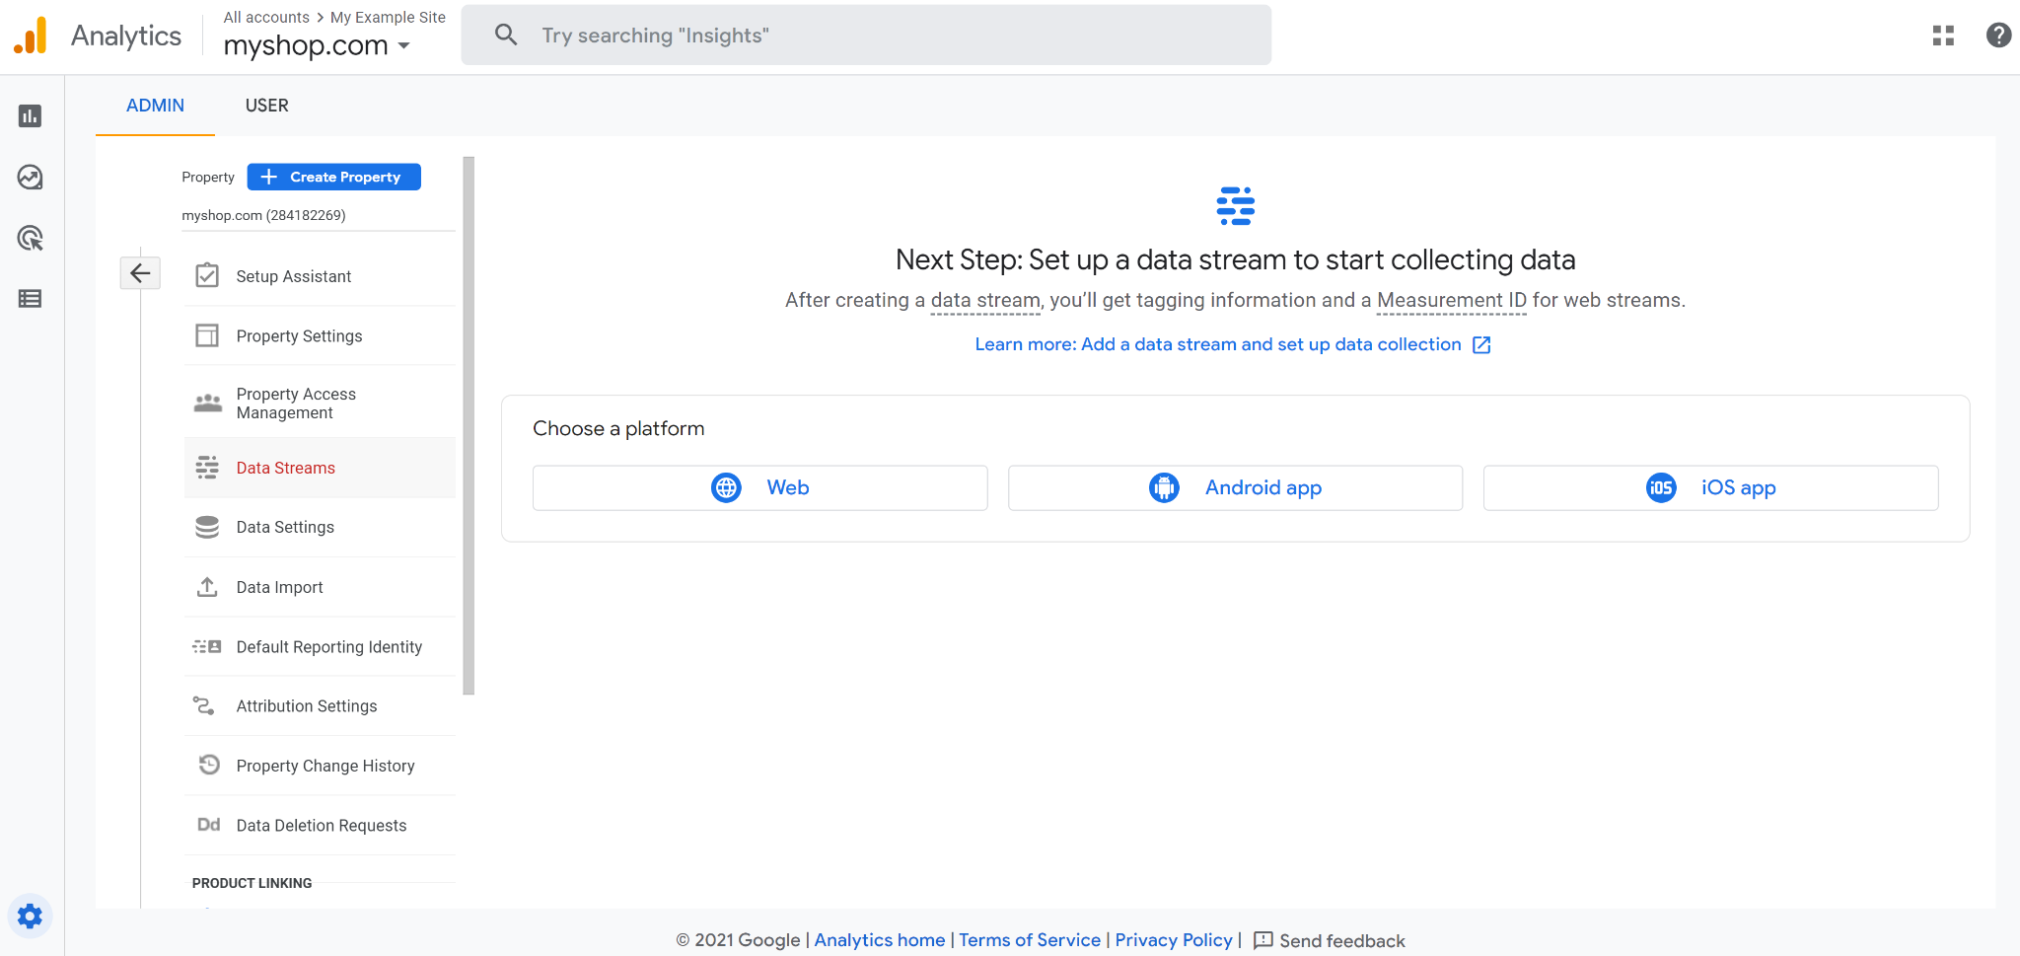
The first time you access your GA4 dashboard, you will be prompted to set up a data stream. Essentially, this is a gateway into GA for the data that you collect from your site (which we’ll cover in the next step).
Before you set it up, make sure that you have selected both the correct account in the top left corner and the correct property in the Admin dropdown menu (this page will look slightly different if you have created a UA property).
Website Details
Once you have selected the correct property, select the “Web” option. You will be prompted to add your domain URL and to name your data stream.
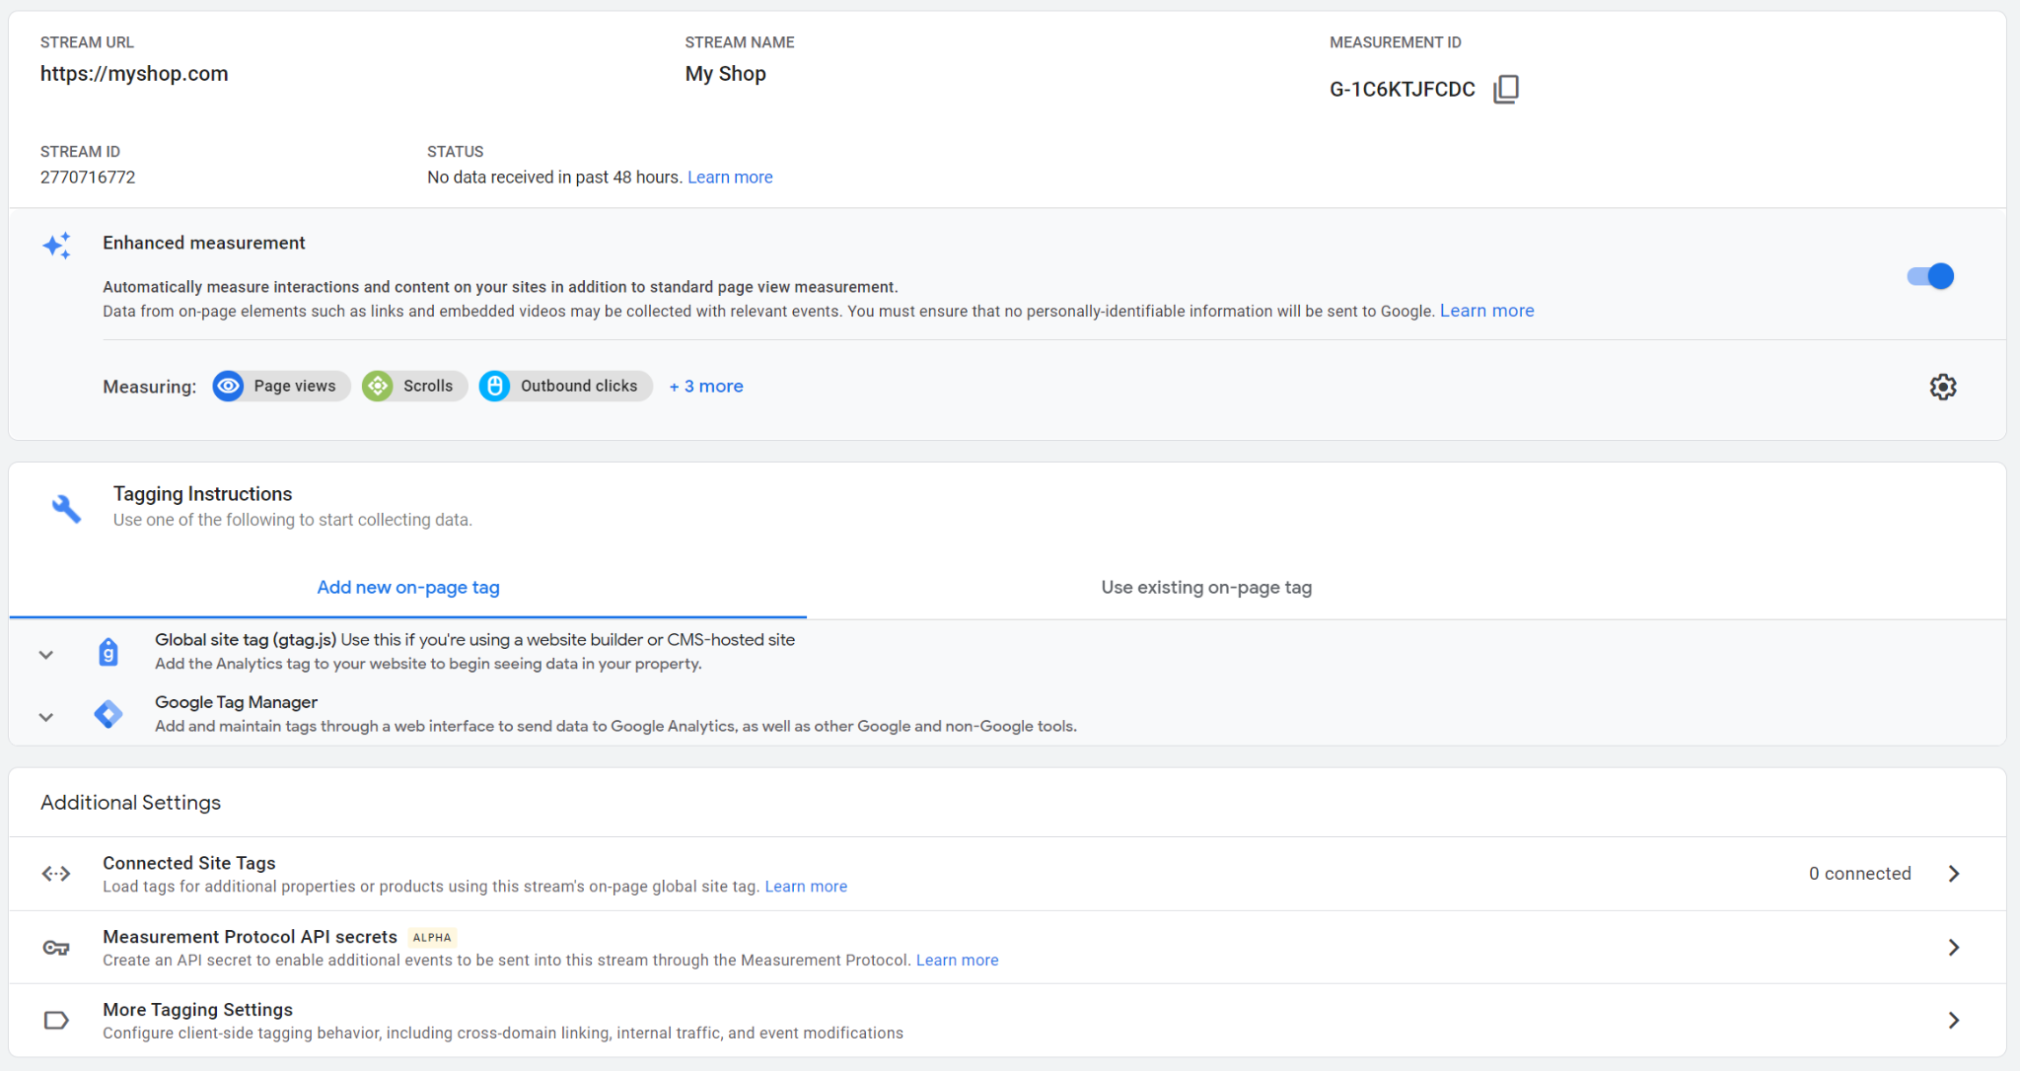
You will also be asked to select which web protocol you are using (i.e. HTTPS or HTTP). If you’re not sure which protocol you are using, check to see if your site has a valid SSL security certificate.
If not, then your site will be HTTP. Alternatively, you can type your URL into a web browser, and then check the security status at the start of the URL.
Note: Ensure that you select the correct protocol, as otherwise, you may have accuracy issues with your data. If you do inadvertently select the wrong one (or your protocol changes at a later date), you can amend it in the Admin settings.
Enhanced Measurements
In GA4, Google automatically assigns several enhanced metrics to measure, alongside the “standard” metrics, such as page views, scrolls, and outbound clicks. You can toggle these measurements on or off (and get a deeper explanation of what each metric is) by selecting the small “Settings” icon in the bottom right corner.

If there are specific things that you want (or don’t want) to measure, then you can select or deselect them here as appropriate. You can also change these preferences at any time. The “Setup Assistant” feature on your GA4 dashboard provides more information on these metrics.
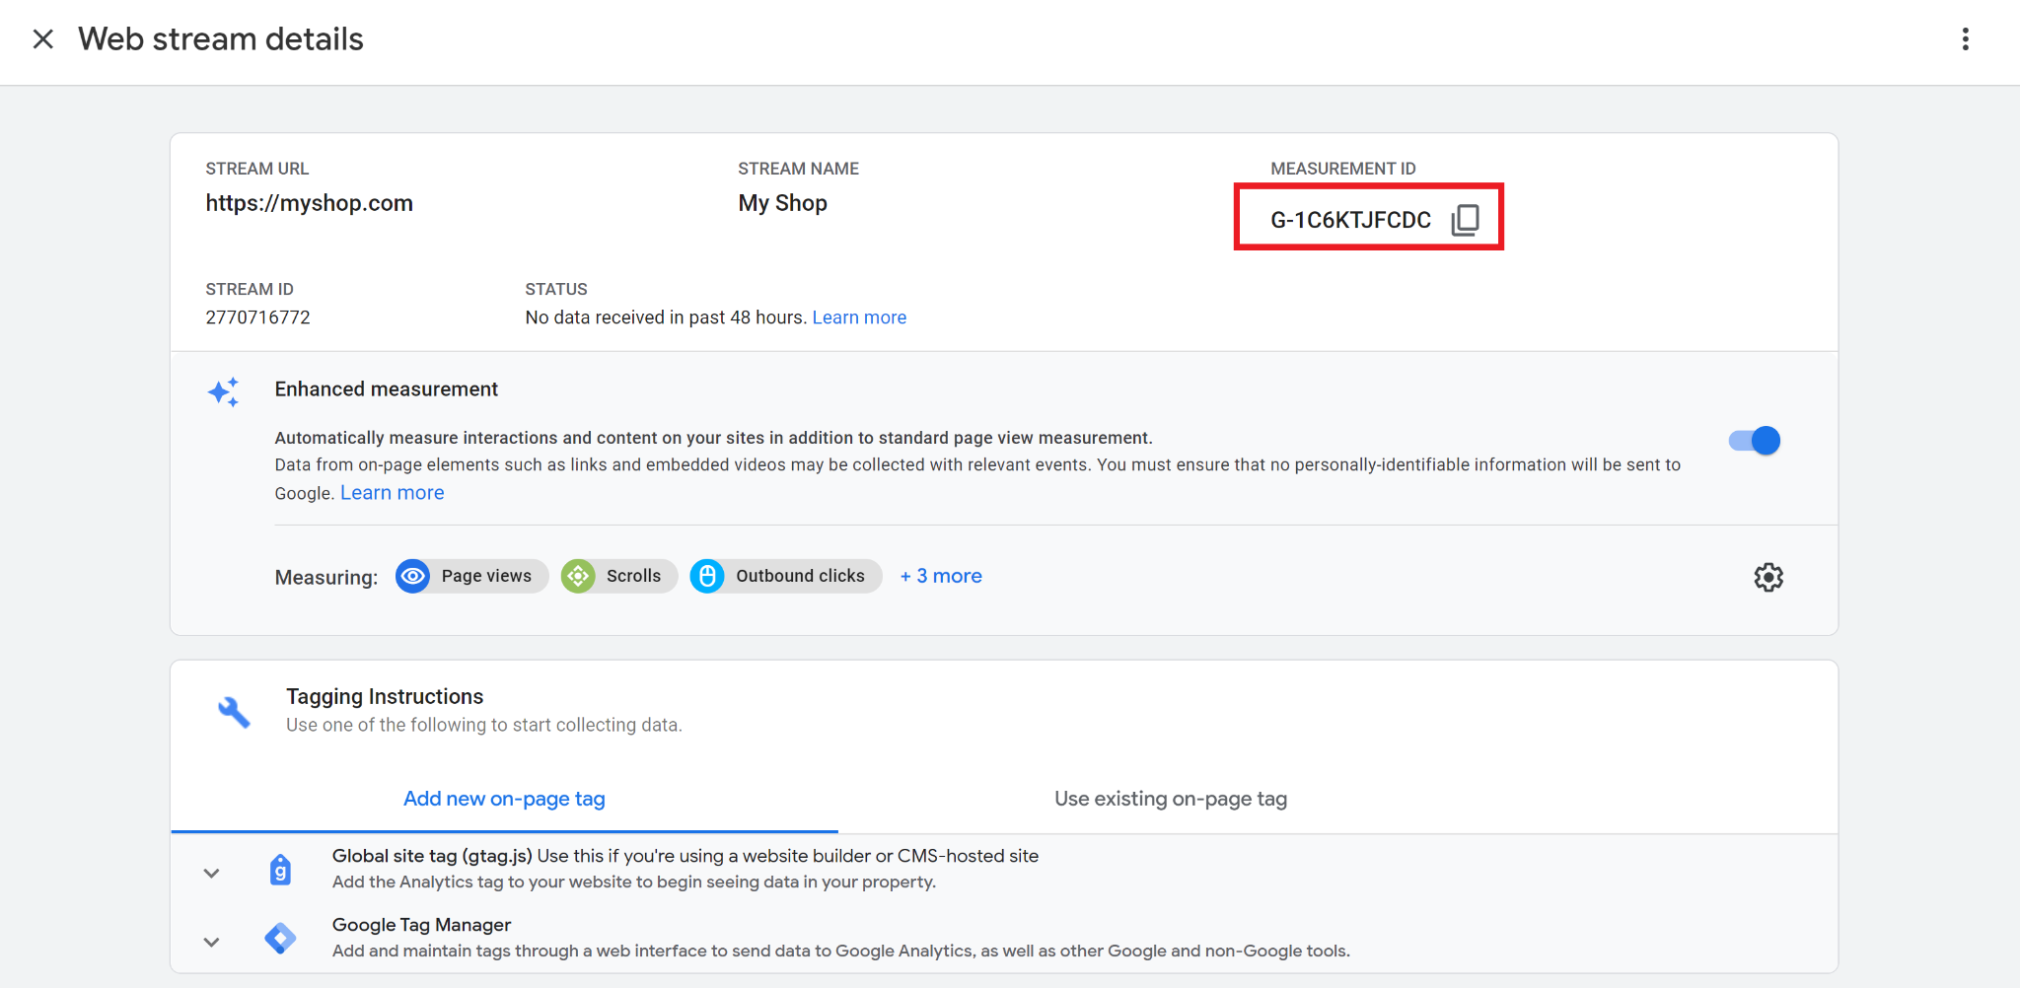
Once you click “Create stream”, you will be given both a unique measurement ID and a unique stream ID, as seen below.
Note: To set up a data stream for your Android or iOS app, you will need to use Google’s Firebase software. The data stream setup tab will take you through the technical instructions of how to configure your app using this software.
Step #3: Start Collecting Data From Your Website
As mentioned, your data stream is the gateway into your GA4 portal. But to actually collect the data itself from your website and send it there, you need to add an Analytics tag — a small snippet of code — to your web pages.
There are several ways to do this, depending on both your preference and the structure of your site.
For CMS-Hosted Websites:
If your site has been created using a CMS-hosted “build-it-yourself” tool, such as Wix or Google Sites, then the setup process is already integrated into these tools. However, the exact steps will differ slightly, depending on who your CMS provider is.
For users of Wix, Google Sites, Wordpress.com, or WooCommerce:
On the data stream page that you created in the previous step, you will see a “G-” ID in the top right corner (see below).
You will need to enter this “G-” ID into the relevant field in your CMS. You can find out how to do this by following each of those providers’ internal instructions:
Wix
Google Sites
WordPress.com
WooCommerce
For all other CMS-hosted websites:
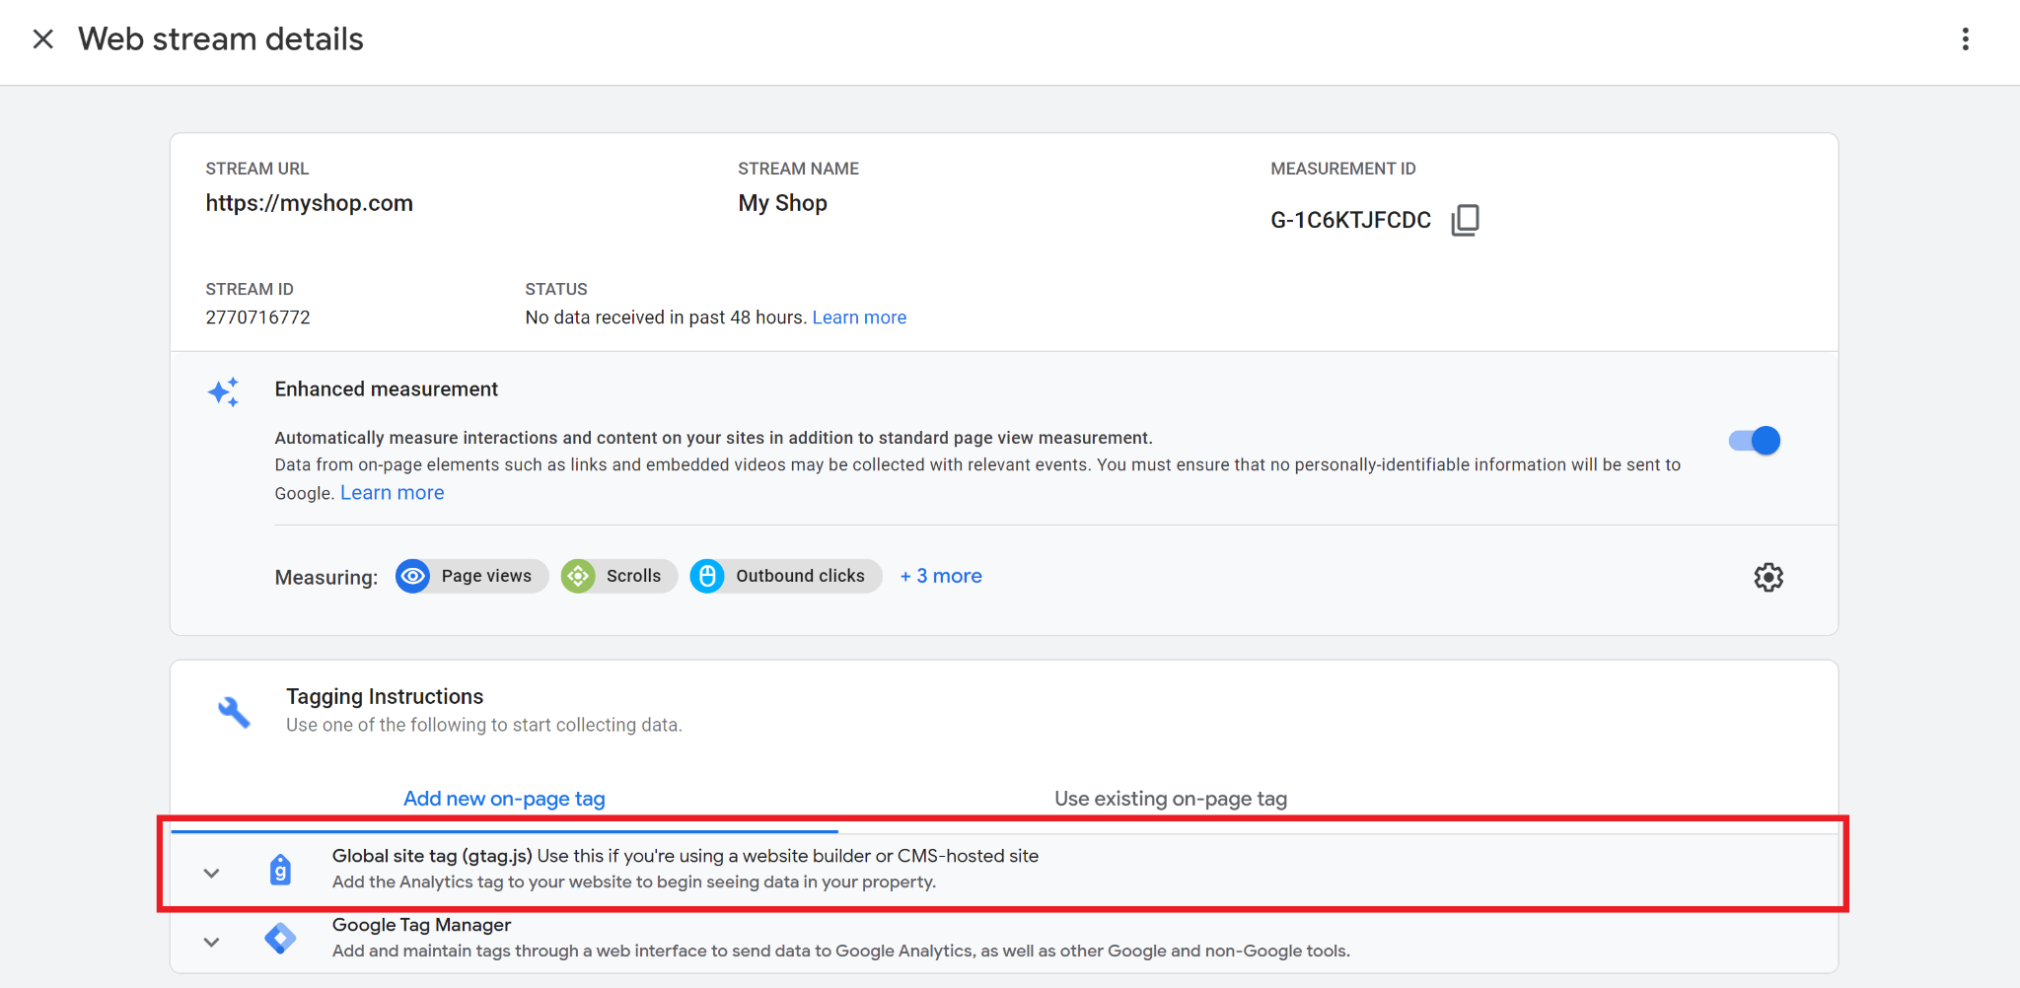
If you’re using another CMS, such as Weebly, Shopify, GoDaddy, or Squarespace, then you’ll need to copy and paste the entire global site tag using that CMS’s custom HTML feature.
As with the “G-” ID, you can find your global site tag on your data stream details page, under the “Tagging Instructions” section.
When you click on it, you will be given a small piece of JavaScript code, like the one below:
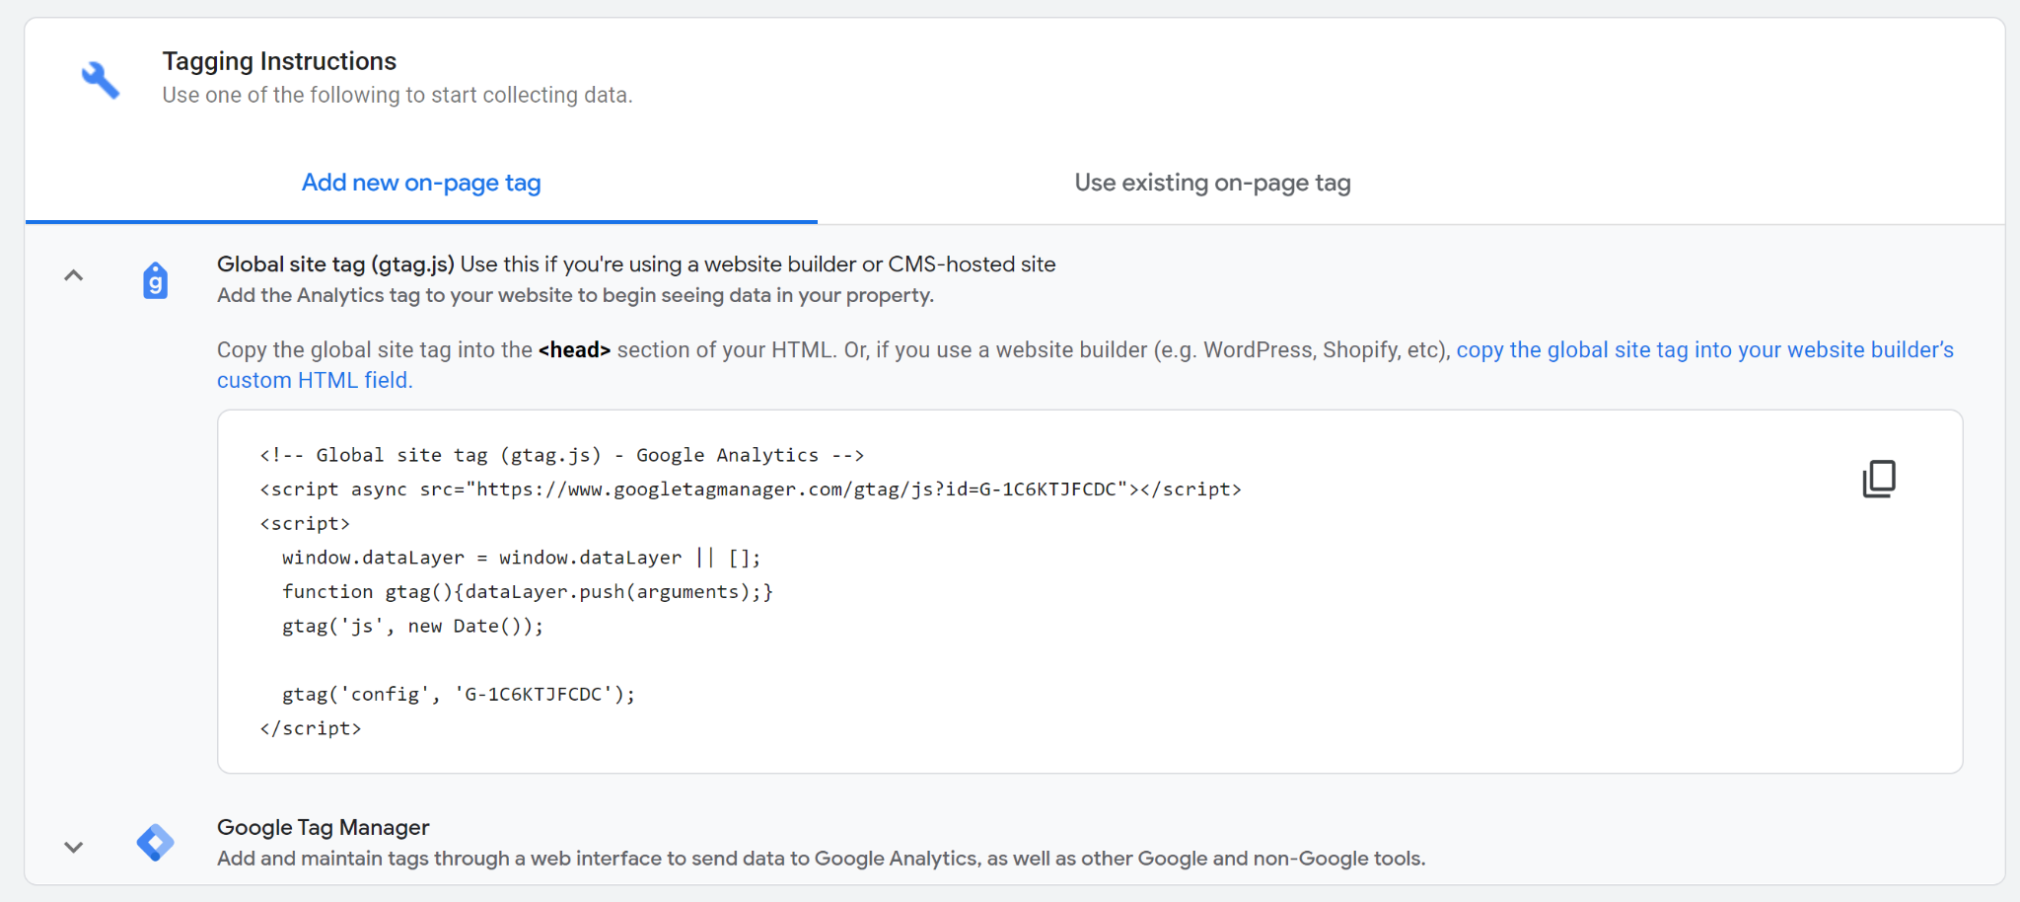
This is your global site tag. Your CMS will have a detailed guide on where to copy and paste this text, so follow those instructions carefully.
For Self- or Custom-Built Websites
If you (or your web development team) have built your own website, then the data collection setup is slightly more manual.
Using the same process as the previous section, select your global site tag (the small piece of JavaScript code in the “Tagging instructions” section). You will need to copy and paste this tag onto every one of your site’s pages, placing it in the header (“<head>”) section of each page’s HTML code.
Take extra care not to accidentally paste the code twice on the same page when doing this.
Other Alternatives
There are also two other ways to manually set up tags on your site:
1. Using Google Tag Manager
Google Tag Manager (GTM) is a separate tool that allows you to set up and manage tags not only for Google Analytics, but also for Google Ads, Floodlight, and a whole host of natively supported third-party tags. If you are running paid campaigns across multiple networks, then this option could help you to organize and manage all your various tags in one place.
Before diving into GTM, it’s a good idea to read Google’s “ Considerations before you install” article. This will give you a better idea of whether GTM is suitable for your needs at this point.
There is also an advanced technical element involved with the installation and setup of GTM. As a result, Google advises that you enlist the assistance of a developer for this process, especially if you are not familiar with code.
If you do decide to proceed, then you can follow Google’s step-by-step instructions for installing and setting up GTM here.
It’s also worth noting that you don’t need to make a definitive decision on whether to use GTM at this point. If you start working with multiple advertising channels in the future, you can always create a GTM account and then migrate your existing GA tags into that account.
2. Using the “G-” ID
For any other platforms or services that accept a “G-” ID, you can simply go into your data stream details, select your measurement ID in the top right corner, and copy and paste it into the relevant field on your chosen platform/service.
Step #4: Configure Your Setup
One of the biggest benefits of GA is that it allows you to customize your data collection and analysis to better reflect your business goals. For example, many businesses will class a “conversion” as a paid purchase.
However, you might define a conversion as a user downloading an ebook, filling out your Contact Us form, or signing up for a free course. This flexibility can significantly enhance your analysis and reporting.
Here’s how to set these configurations up.
On the left-hand side of your GA dashboard, click the “Configure” icon.
This will take you to a page where you will be able to configure custom events, conversions, and audiences.
Create Custom Events
In GA, events are triggered every time a user interacts with your site in a pre-defined way. For instance, every time someone views your page, this triggers a “page view” event.
By default, GA4 already collects data on a wide range of these events. Many are automatically collected, while others you will have already selected or deselected during the “Enhanced Measurements” set up in Step #2.
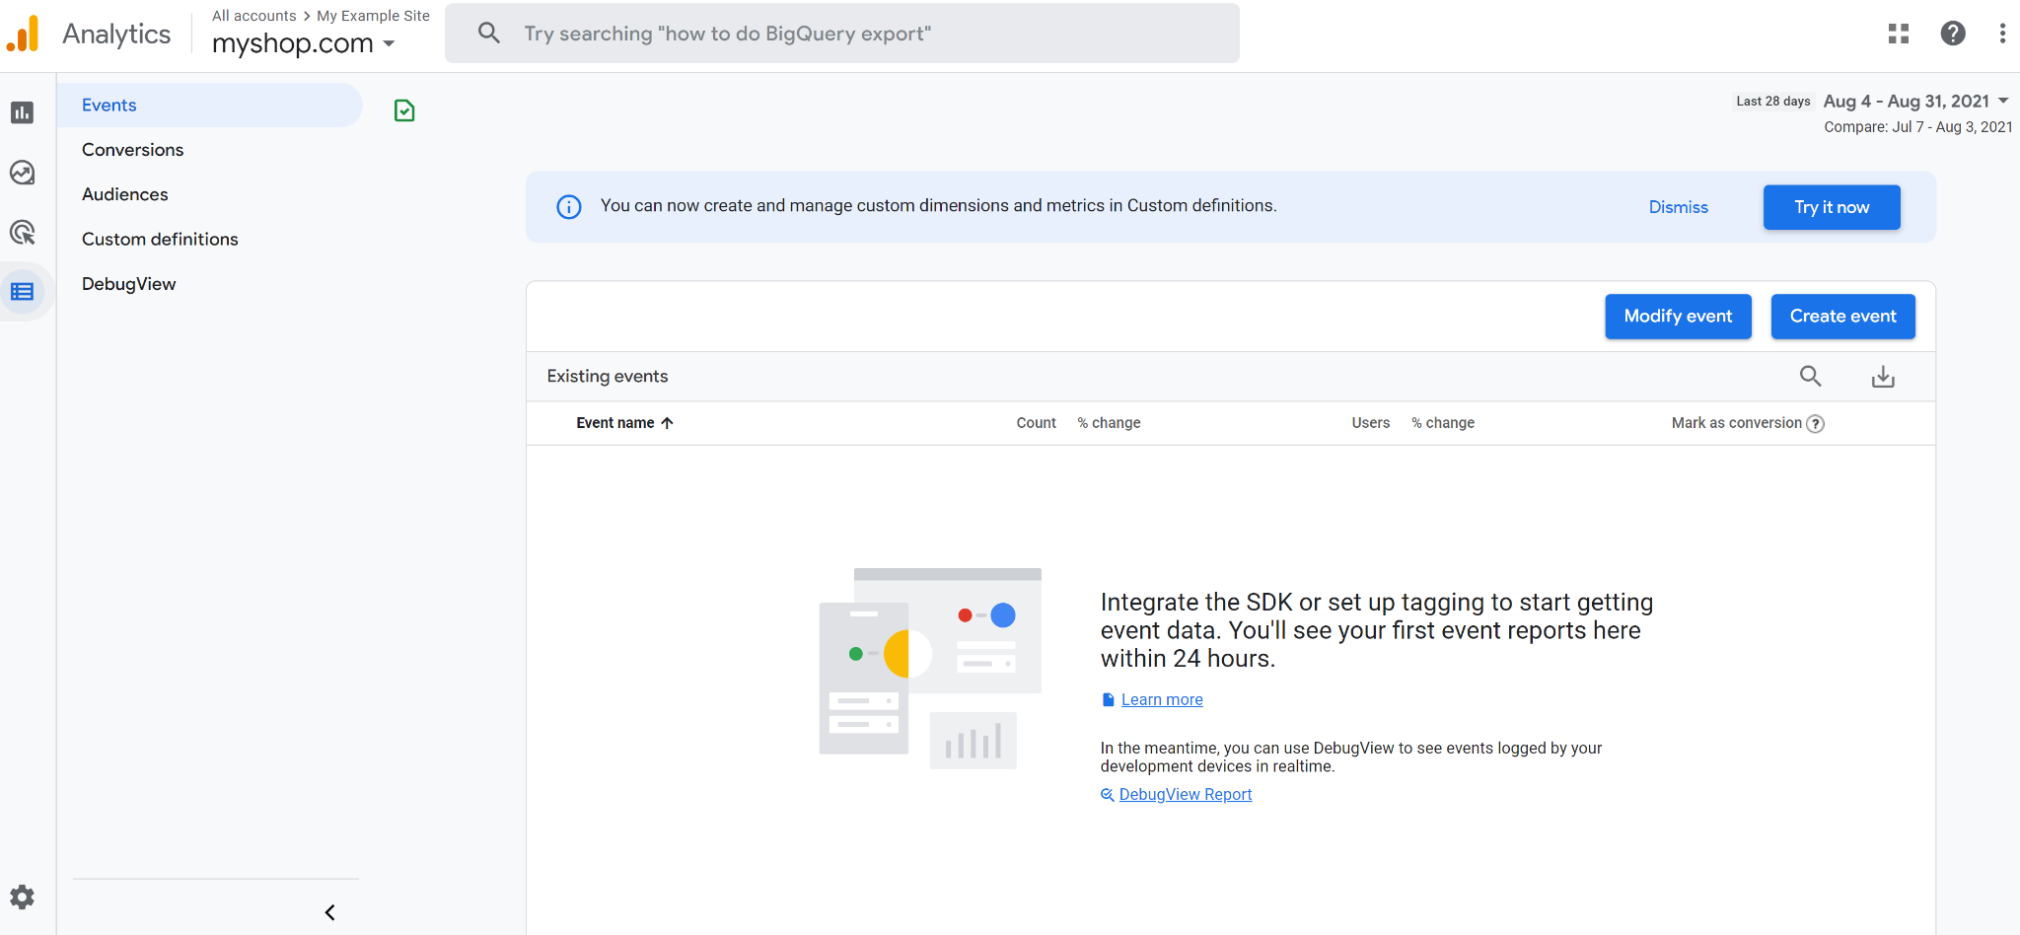
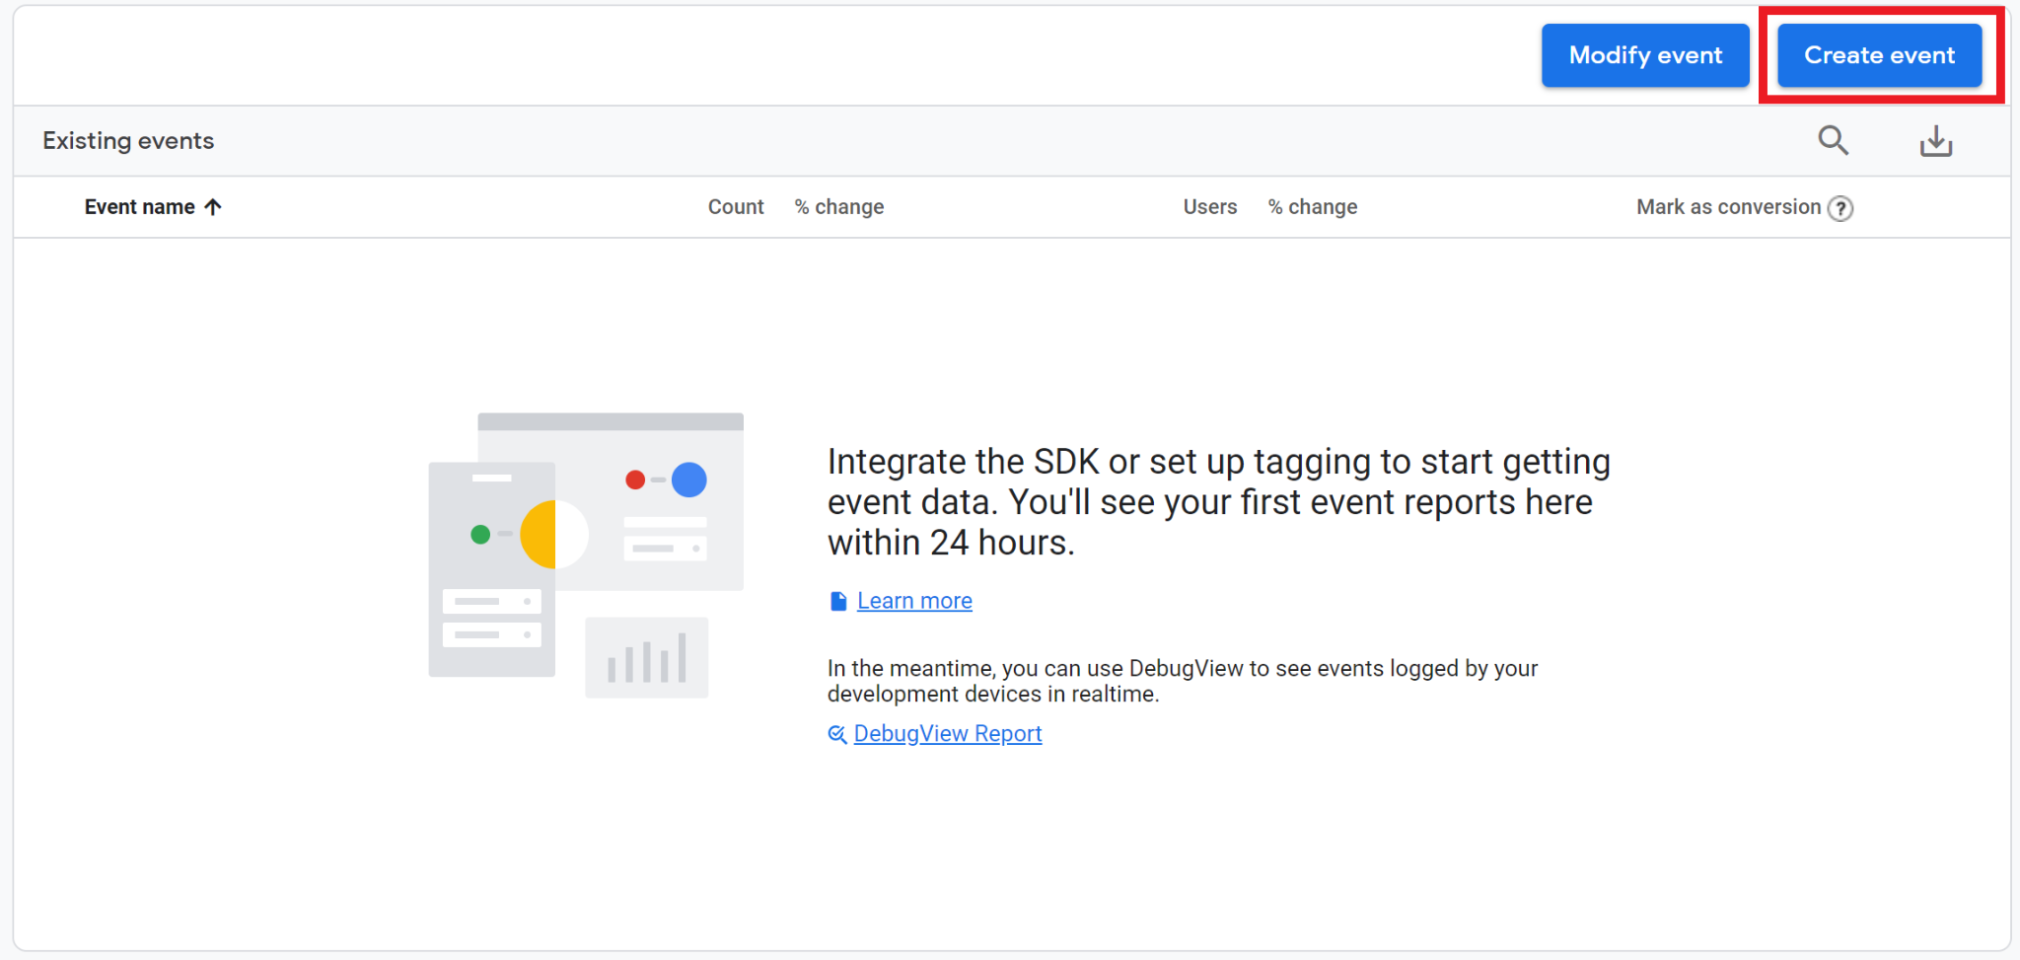
Therefore, it’s unlikely that you will need to add any more. However, if you are certain that your desired event doesn’t already exist, you can create a custom one (or modify an existing one) by choosing “Events” from the menu and then selecting “Create event”.
For your event to be satisfied, it will have to meet certain conditions, which you will set yourself. It’s highly recommended to follow Google’s in-depth, step-by-step instructions to ensure that you do this correctly.
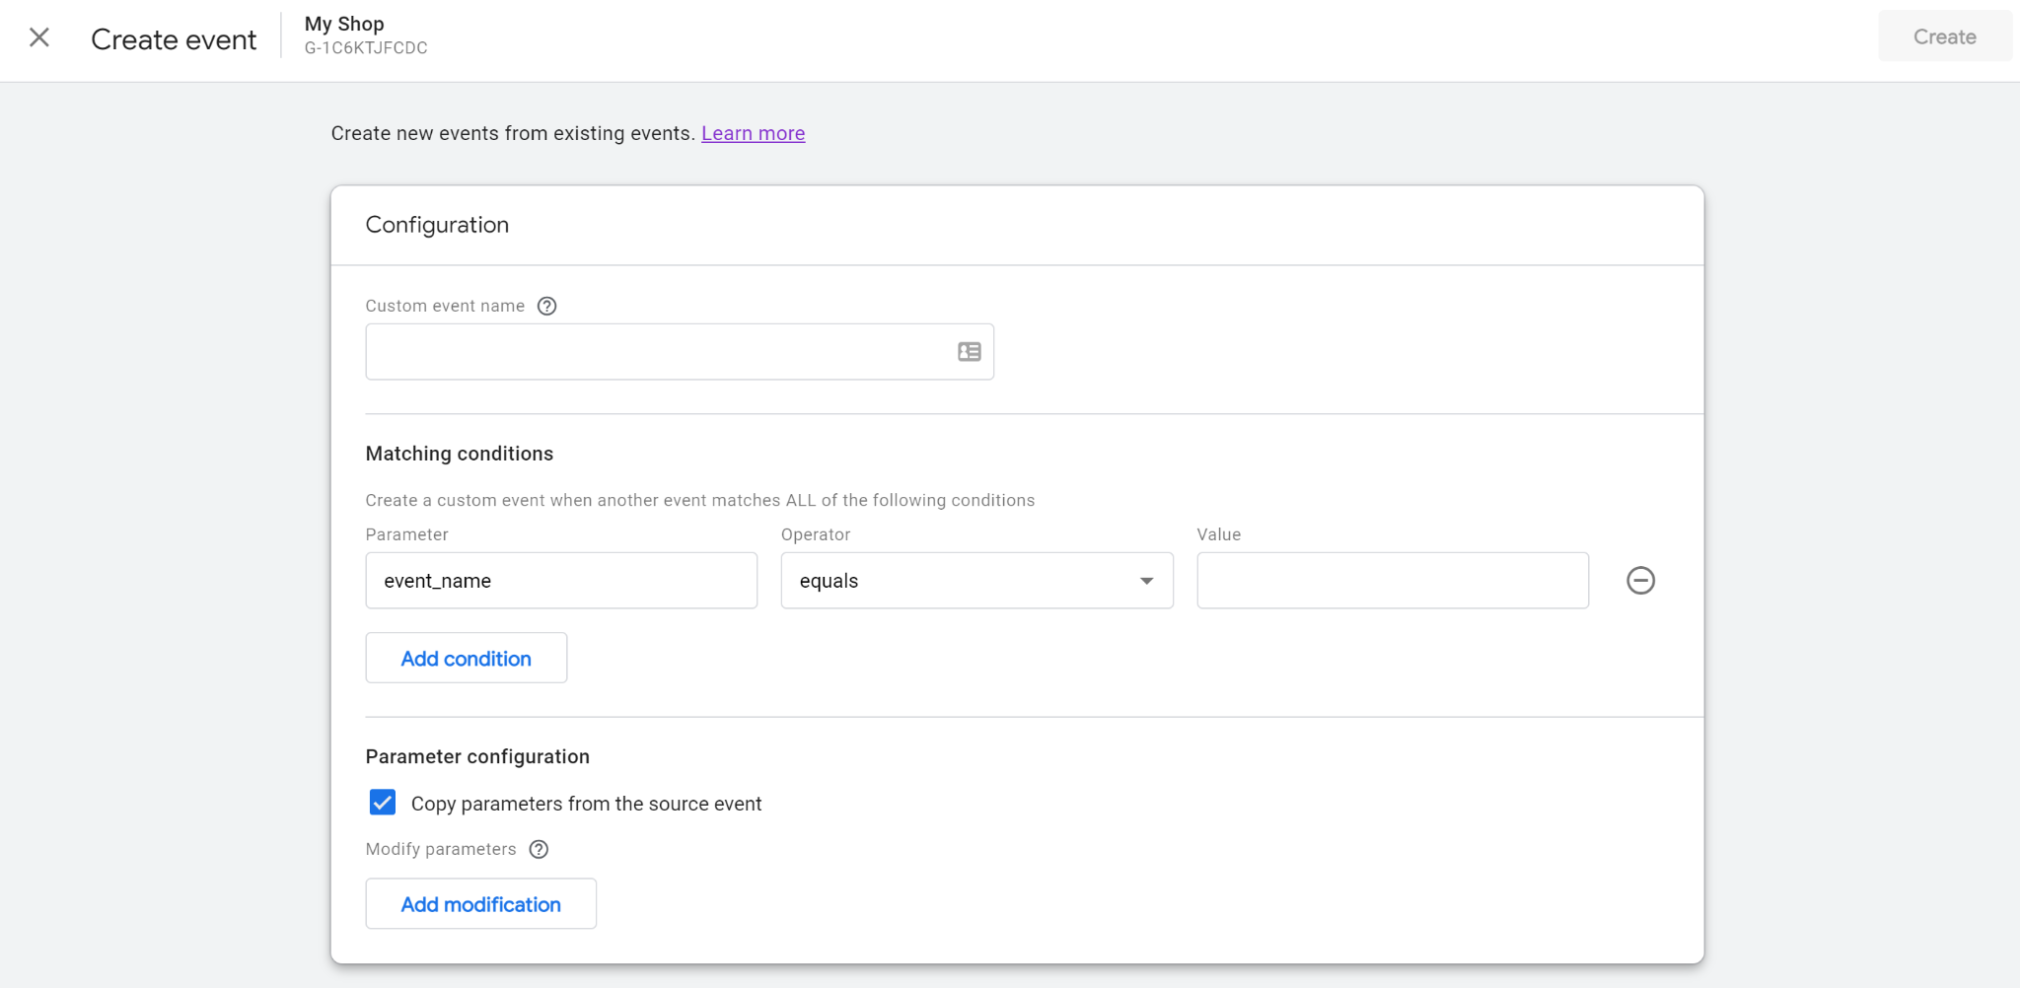
Once done, click “Create” in the top right corner, and your event will automatically save.
Define Your Audiences
Audience segmentation is a significant factor in marketing strategies, so you might find it beneficial to create your own custom audiences. To do this, select “Audiences” in the menu list, and then click “New audience”.
Google will automatically suggest audiences based on a number of factors, such as existing user data, acquisition methods, or demographics, or you can create your own from scratch.
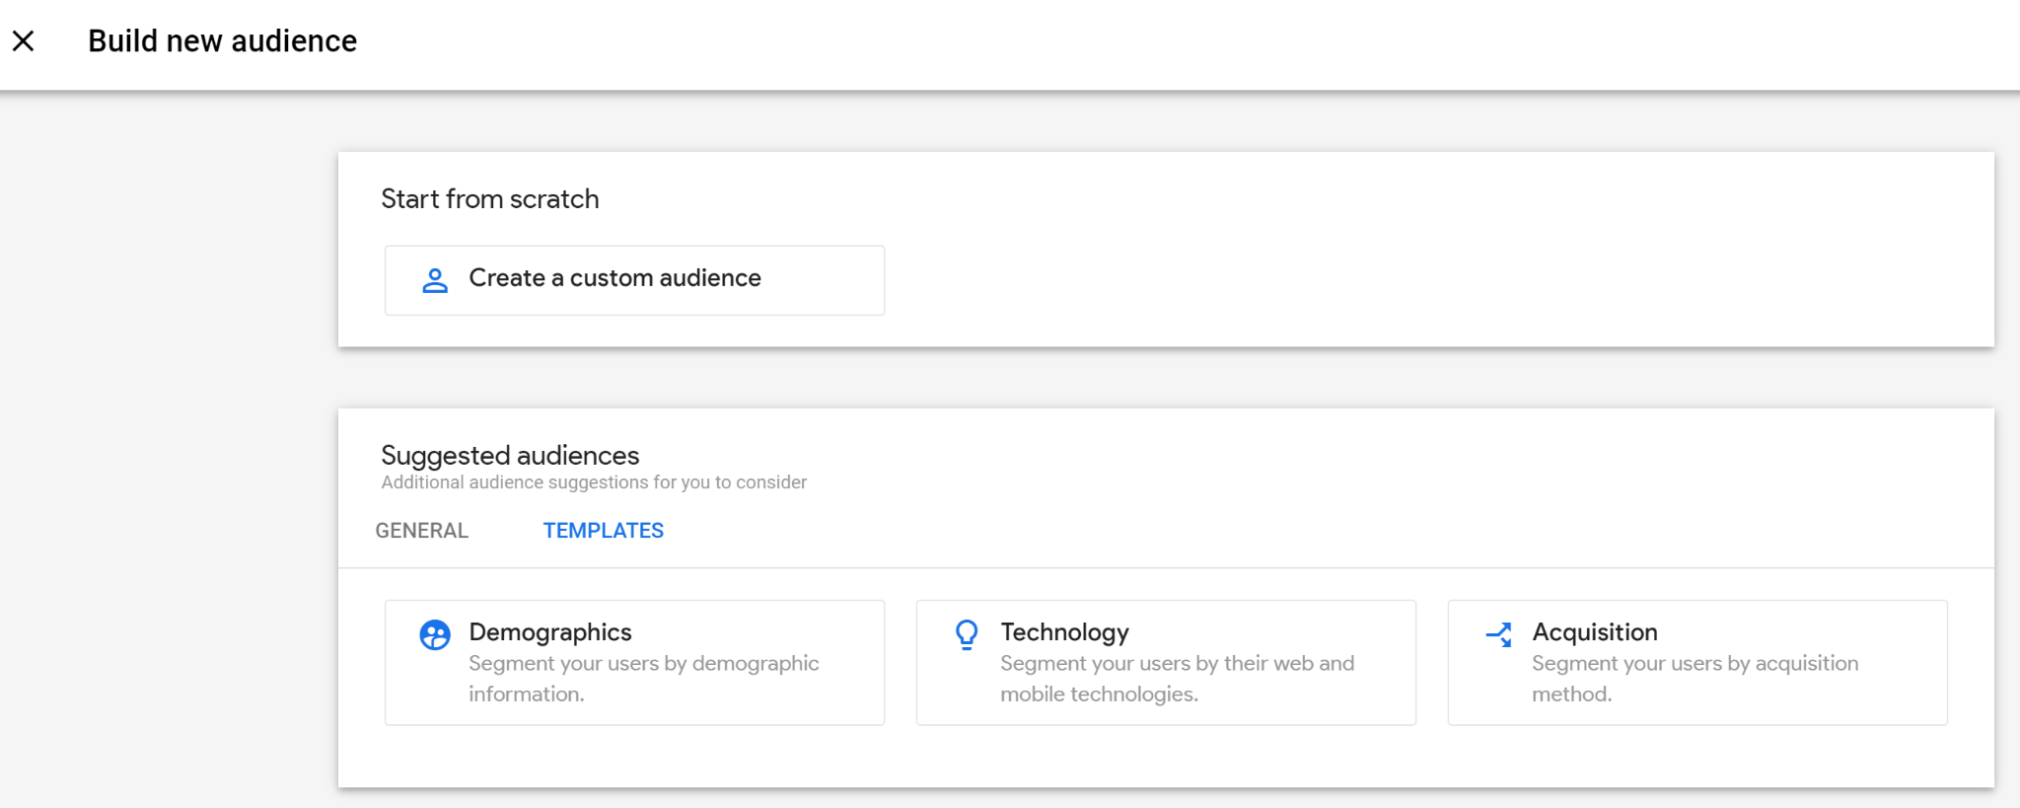
There are a wide variety of identifiers and parameters available, allowing you to create as tailored an audience as you want. Let’s say, for example, that you want to create an audience for a particular social group using Google’s pre-set “Demographics” template.
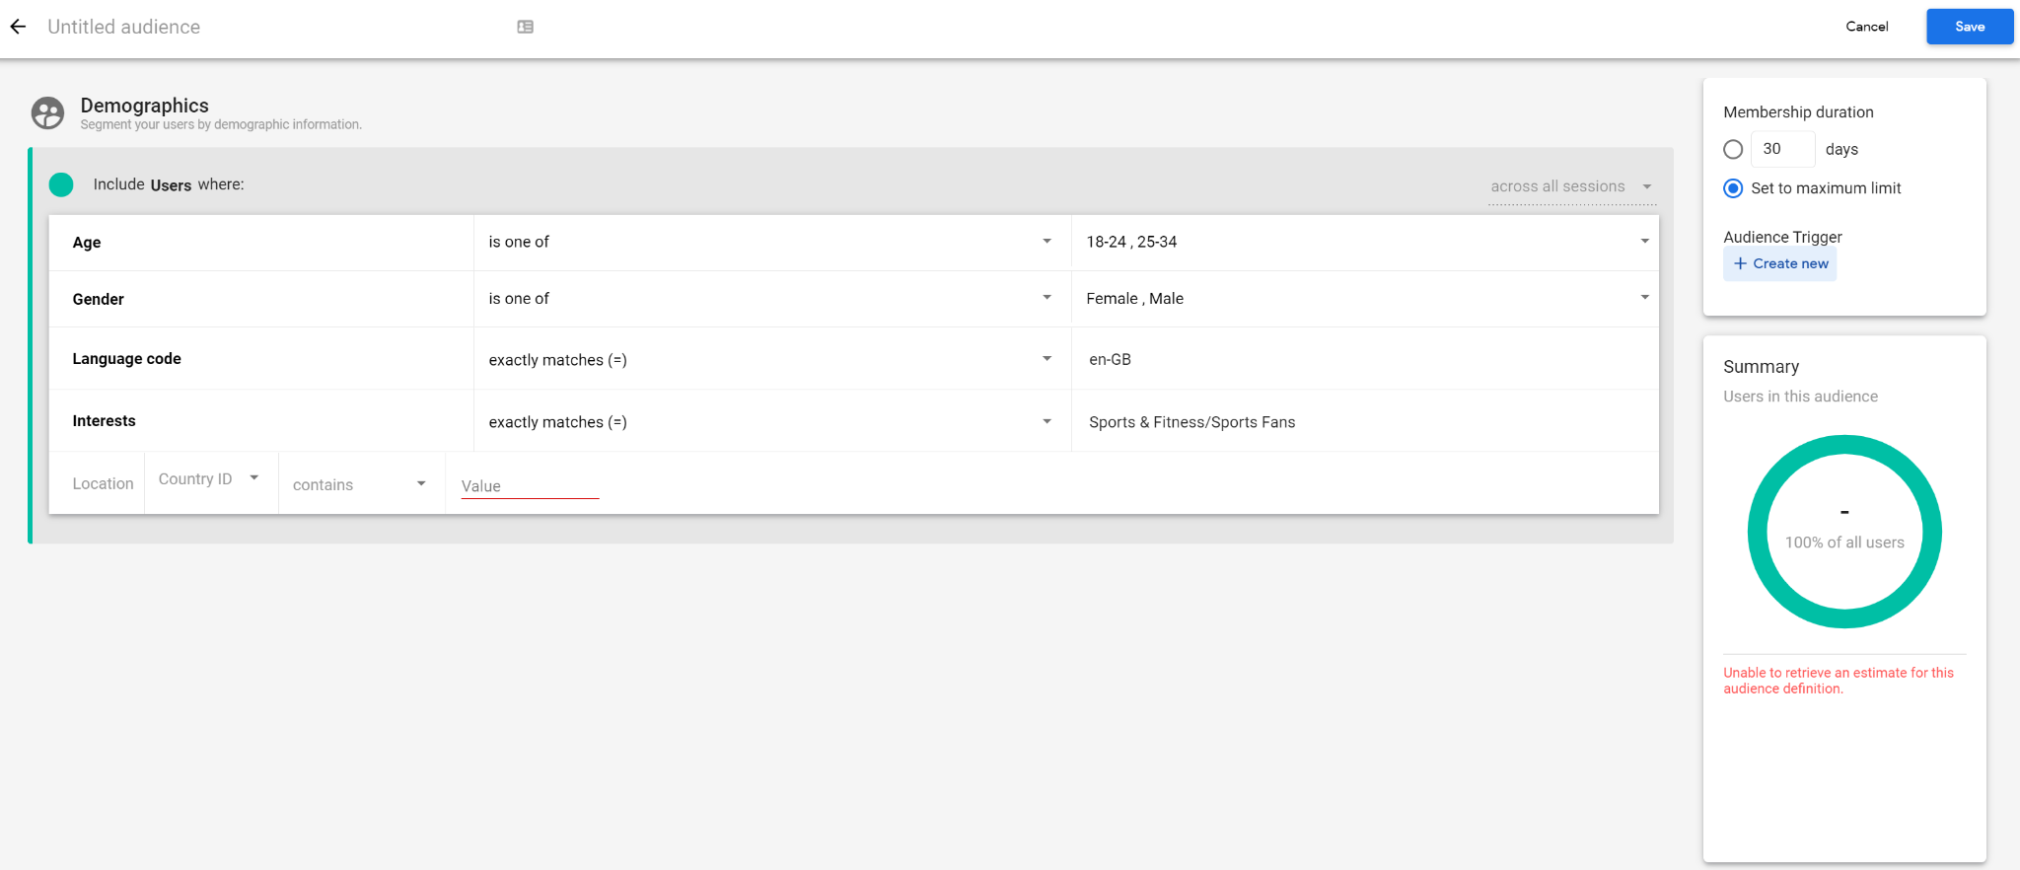
Simply fill in the informational boxes using the parameters and identifiers that you require, and hit “Save.” You can also create a trigger to identify when a new user becomes part of this audience.
Create Custom Conversions
As mentioned earlier in this step, a conversion doesn’t always equate to a purchase. Therefore, to define your own, select “Events” from the menu list and search for the event that you want to mark as a conversion.
For instance, if you want to define a course signup as a conversion, you’d select “course_sign_up.” Then, under the column header “Mark as conversion”, set the toggle bar to “on”.
To verify that this has worked, you can go to the “Conversions” tab in the menu, and your event should appear in the “Conversions” list.
If you can’t find the event you’re looking for, then you can create a new one using the process described above, under “Create Custom Events.”
Step #5: Verify Your Setup
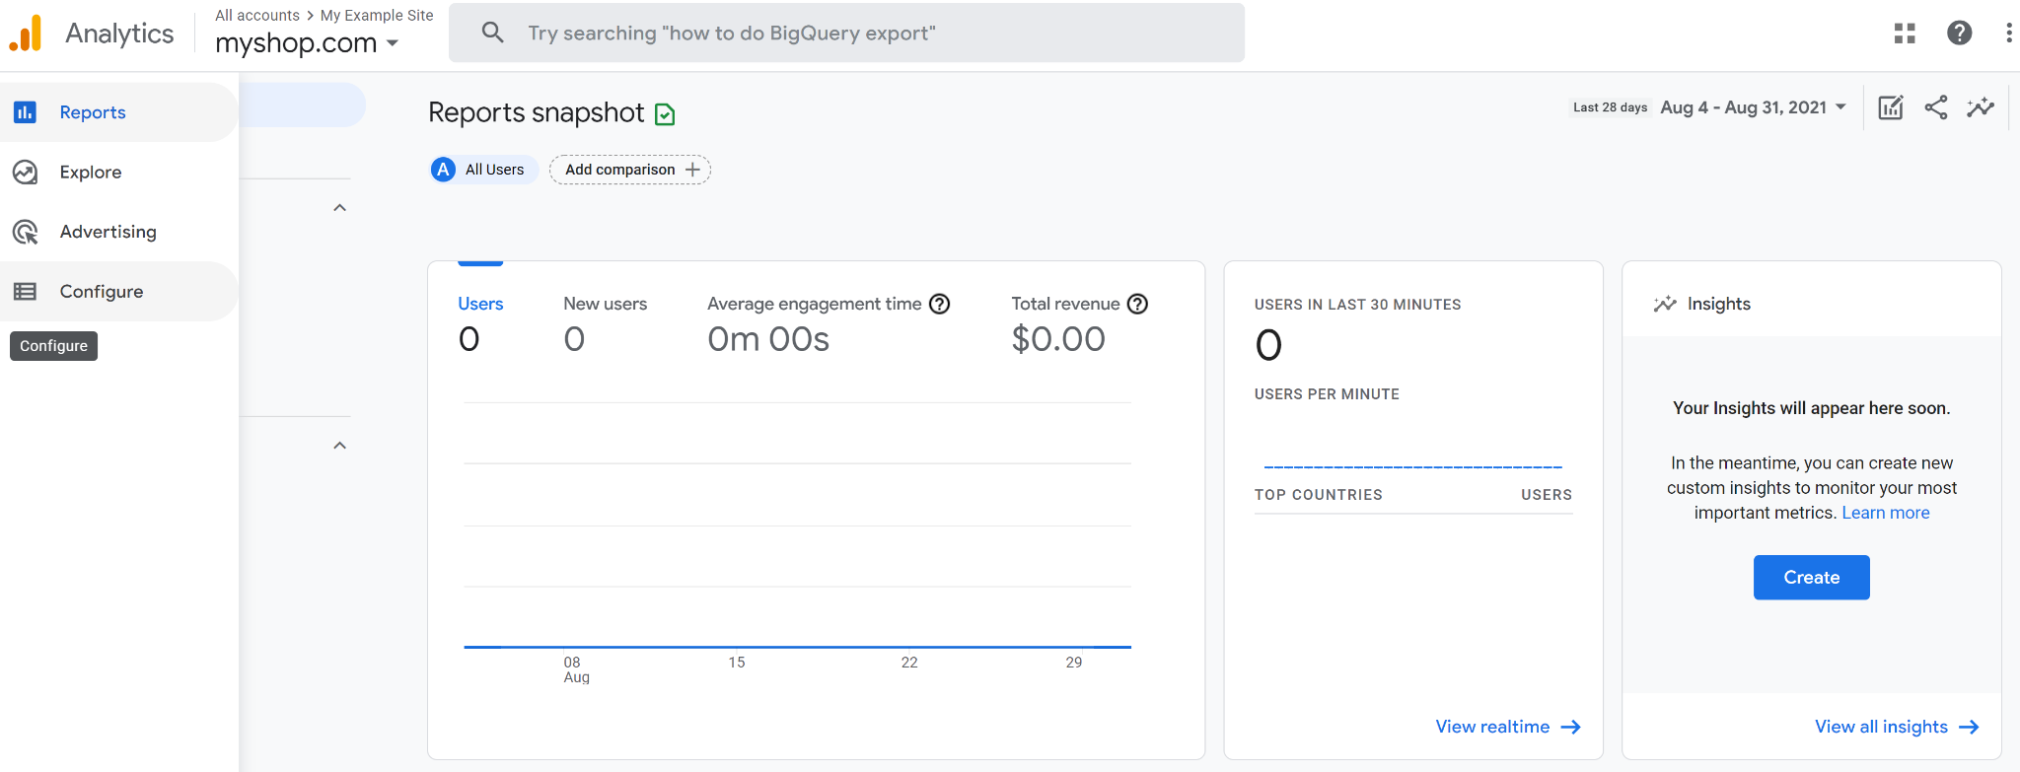
To ensure that you’ve set up GA successfully and that you’ve correctly placed the Analytics tag on your website, wait for 15 to 30 minutes after you’ve completed the setup. Then, go to “Reports” in the top left corner of your GA4 dashboard, and open the “Realtime” report.
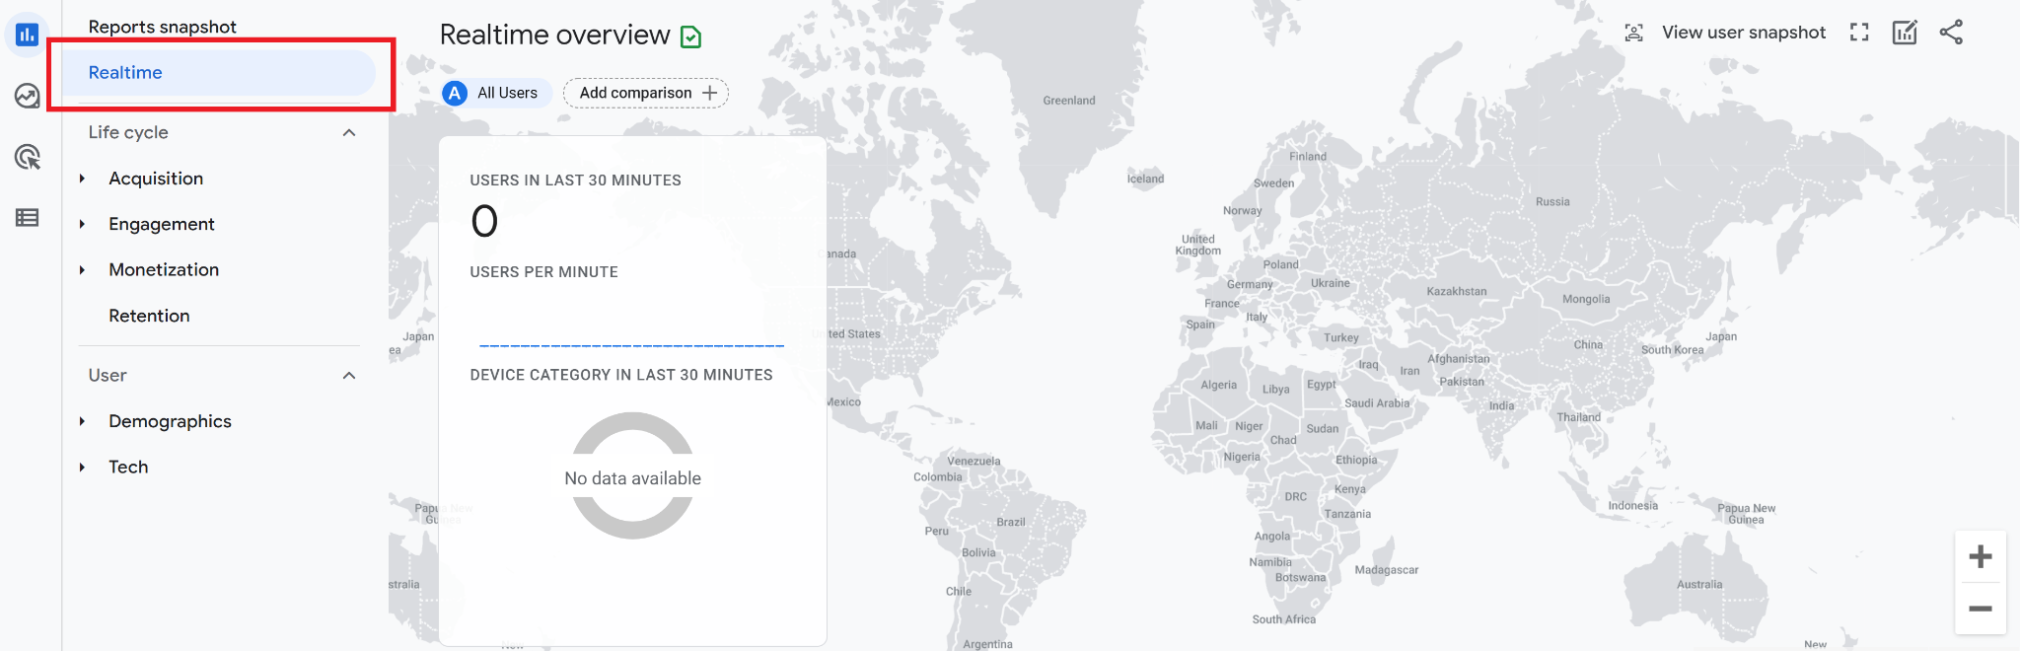
If everything has been done correctly, the “Users right now” card should be refreshing every 15 seconds with a new count of users.
It takes between 24 and 48 hours for Google to start processing the data for all other reports, so you will not be able to see any user behavior or acquisition information before then. If, after this timeframe, you still don’t see any data, consult Google’s troubleshooting section.
What’s Next?
Once GA has successfully been installed and you are starting to collect data, it’s important to start leveraging the value of this information.
As we’ve already mentioned, the data that GA collects can:
Provide you with better (and more accurate) insights into how your website is performing. Inform your marketing (and business) decisions going forward. Generate additional value and capabilities for your day-to-day workflow.To learn more about this, you can check out our in-depth guide on using Google Analytics as a marketing tool.
However, GA can also be used in conjunction with a whole host of other tools, such as Semrush. This integration combines multiple tools in one location, providing deeper levels of insight and value.
Using Google Analytics With Semrush
Using Semrush as an example, let’s look at how GA can be integrated with other tools for better performance analysis.
On Page SEO Checker. This tool offers in-depth, on-page SEO advice for your content, leveraging GA metrics (such as bounce rate, time on page, and load time) to identify potential page/user experience issues. Backlink Audit. This is a powerful tool that reviews your backlink profile and identifies any toxic links. When connected with GA, the Backlink Audit provides users with more accurate toxicity scores of backlinks. Organic Traffic Insights. GA does not provide full keyword data, which is why Organic Traffic Insights is a helpful tool for marketers. However, connecting GA provides additional data for more in-depth data. My Reports. This popular reporting tool integrates data from several Google tools, including GA, to make client and internal reporting as quick and seamless as possible. Content Analyzer. When you integrate GA with this tool, you can conduct more accurate content audits in terms of page metrics. This can help you to prioritize your next steps post-audit. SEO Dashboard. When used with both GA and GSC, this tool gives you a real-time, highly accurate overview of your site’s search engine performance. Brand Monitoring. When integrated with GA this tool makes it possible to track the referral traffic you get from branded mentions with backlinks, allowing you to analyze more closely the traffic impact of your media partners. Site Audit. When conducting a site audit, GA provides page view results, as well as information on orphaned pages and pages with a slow load time. Marketing Calendar. If you are running UTM campaigns, then you can add these GA tags to the Marketing Calendar tool and track their performance. Position Tracking. The Position Tracking Tool allows you to track daily keyword rankings on any device. You can import keywords directly from GA to support this.As you can see, GA is an extremely useful tool on its own, but when combined with other powerful tools such as Semrush, the possibilities widen.
Final Thoughts
Google Analytics is a crucial digital marketing asset for any business of any size. But it’s also powerful, meaning that it should not be treated lightly.
Here’s how to get the most out of GA:
Ensure that you set it up correctly, using the steps described in this article. If you are unsure of anything, you can always consult Google’s internal support literature. It’s also best to avoid making any technical changes that you don’t fully understand. If possible, take the beginners’ Google Analytics Academy course (as well as the other courses available in this resource). This will build your confidence and knowledge of using the tool, and help you to analyze your data more effectively. Once set up, integrate your account with other trusted tools, such as Semrush. This will allow you to fully leverage your data, and enhance your digital marketing capabilities.To find out more about integrating Google Analytics with Semrush, you can check out our in-depth guide.
Innovative SEO services
SEO is a patience game; no secret there. We`ll work with you to develop a Search strategy focused on producing increased traffic rankings in as early as 3-months.
A proven Allinclusive. SEO services for measuring, executing, and optimizing for Search Engine success. We say what we do and do what we say.
Our company as Semrush Agency Partner has designed a search engine optimization service that is both ethical and result-driven. We use the latest tools, strategies, and trends to help you move up in the search engines for the right keywords to get noticed by the right audience.
Today, you can schedule a Discovery call with us about your company needs.
Source:

