

Google Tag Manager is a vital tool for any webmaster or site owner. The system plays a critical role in managing any website’s tags. It makes tag management fast, efficient and easier to understand for those of us who aren’t pro coders. This definitive guide will give you all the information you need to become a Tag Manager expert.
Tags are snippets of code added to any website’s pages. They have a range of different functions. One prime example is the JavaScript code tag which is vital to making Google Analytics work. That tag collects the data that Analytics needs to deliver its various reports and insights. Other tags can extract and send different information to platforms like Google Ads, and many others.
Effective management of your site’s tags, then, is crucial to performing analytics on the website. That, in turn, makes it critical to optimizing the site performance. That’s why you’ll want to read on and learn how Tag Manager makes it so much simpler to produce and implement all the tags your site needs.
What Is Google Tag Manager?
Google describes its Tag Manager product as a ‘Tag Management System’ (TMS). That’s an excellent way to think about it. It does for a website’s tags what a Content Management System (CMS) does for its content. The service provides an interface through which to create and track all the tags your site needs.
You no longer have to code each tag manually. Instead, you can create all your tags through the interface. Tag Manager will then implement them for your site. That is if you’ve embedded a straightforward piece of Tag Manager code into each page of the website.
There are three main benefits to handling tags in this way:
Easing Pressure on Developers — Neither you nor your company’s web developers need to worry about manually coding tags. That frees up more time to spend on other tasks like managing your site’s content.
Greater Accuracy — Tags coded by a person are more susceptible to errors. A simple typo or copy and paste issue can render a tag useless. Tag Manager won’t make such errors.
Marketing Control & Oversight — The Tag Manager interface makes it much easier to control and track all your tags. That means you can create and use more tags that directly relate to your marketing priorities. It’s easier to produce and implement tags to collect information for your marketing activities.
Tag Manager can give you that control and mastery over tags for a range of analytics platforms. Getting started with Tag Manager is nice and easy, not to mention free. The first thing you have to do is to set up your Tag Manager account.
How to Set Up a Google Tag Manager Account
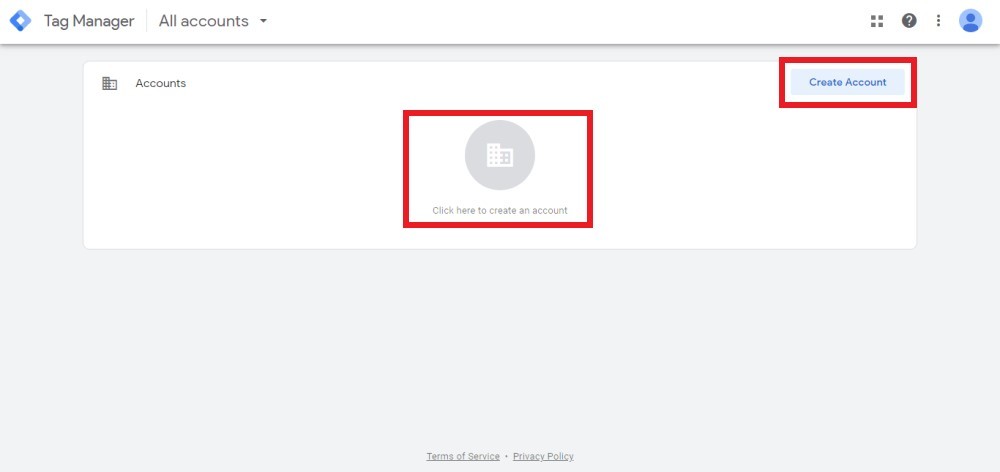
To get started with Tag Manager, you have to set up an account with the service. Unlike many of Google’s products, you won’t be immediately logged in to Tag Manager via an existing Google Account. Instead, head to the Tag Manager site and click one of the ‘Create Account’ buttons, as shown below:
You then have to input a few different pieces of information. First, you need to choose a name for your Tag Manager account. Google recommends each business creates only one account. Your company name, then, can also serve as your account name.
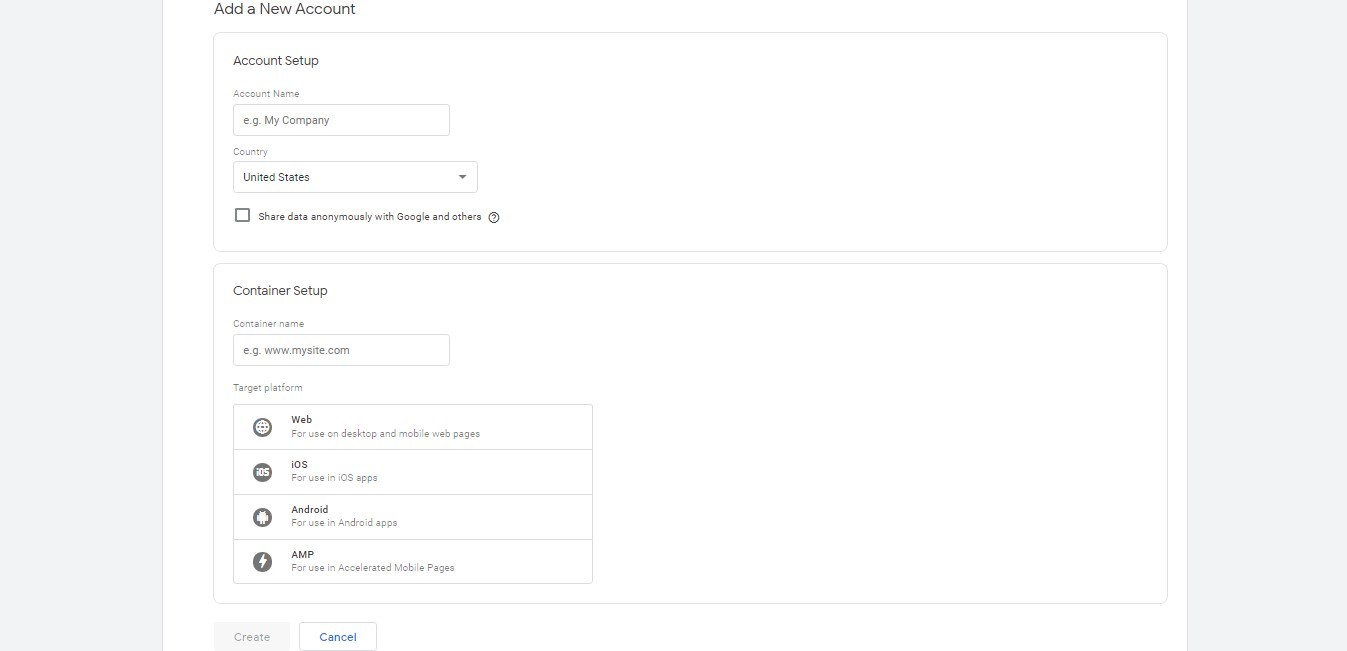
You also need to choose a ‘Container Name’. The container is the piece of code you must add to your webpages for Tag Manager to work. The container name should be the name of the site or sites where you’ll be embedding the container. Then, all you need to do is choose the relevant platform from the menu and click ‘Create’.
Once you’ve worked through that simple page, you’ll see two popups. The first is the Google terms of service, which you need to accept. The next displays all the details of the container snippet you need to add to your site’s pages.
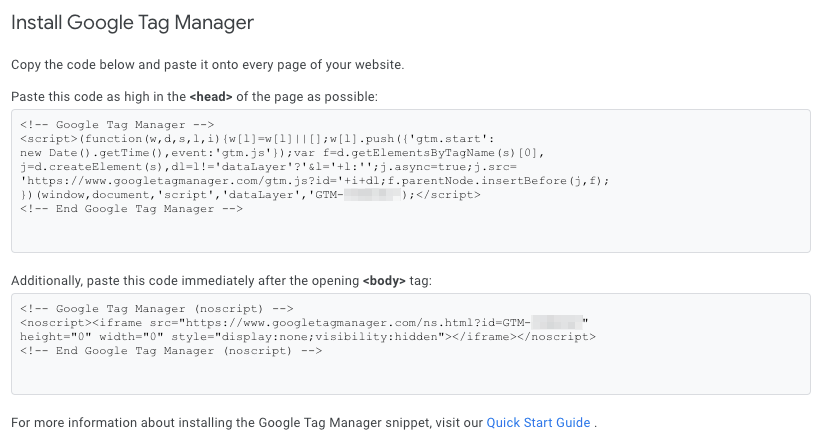
There are two parts to the container snippet. The first piece of code uses JavaScript extract information. You should place that snippet as high up in the <Head> section of your pages as you can. The second snippet is an HTML iframe. You need to put that code immediately after each page’s opening <Body> tag.
The HTML iframe element of the container only comes into play in specific circumstances. Those are when a site visitor has disabled JavaScript. Having that snippet embedded ensures tags still fire, even without JavaScript.
Once you’ve set up your account and your first container, you’re ready to roll with Tag Manager. You can now start to learn a little more about the interface and the elements that it contains.
Tags, Triggers and Variables
Every analytics platform has its vocabulary. They all use unique words and phrases that you may not have come across if you haven’t used the tool before. Google Tag Manager is no exception.
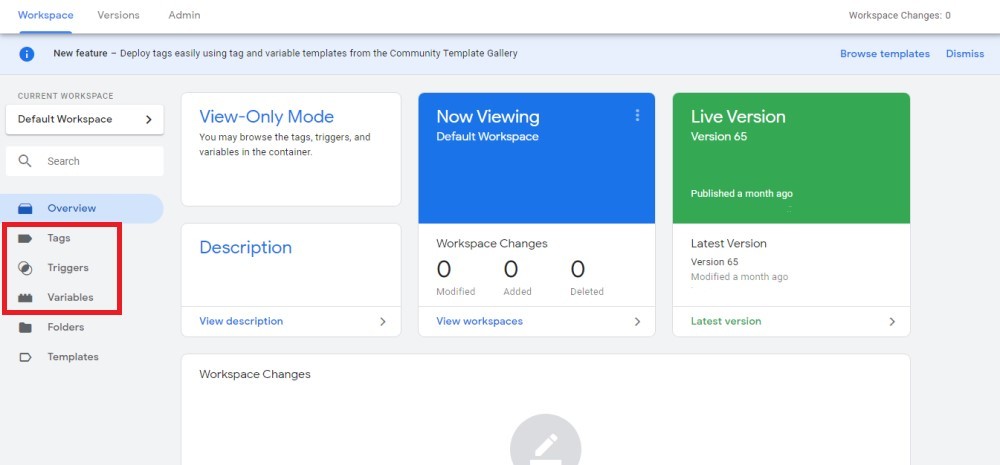
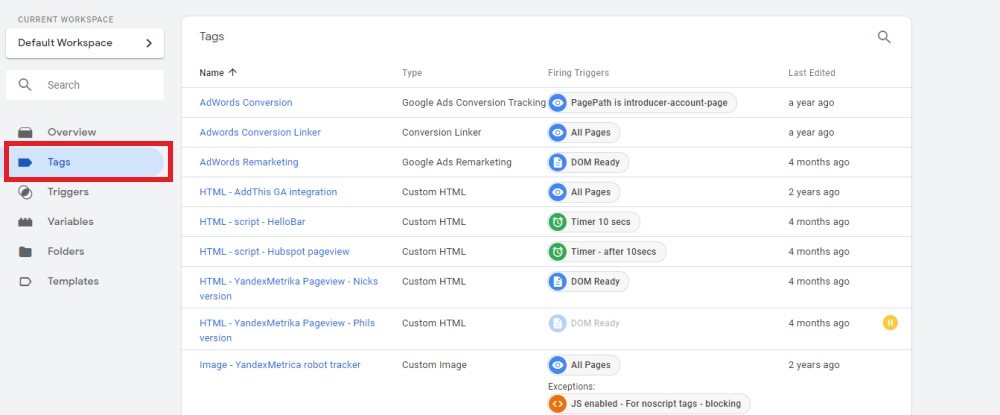
The TMS uses three labels in particular that you must understand. Knowing what they’re all about will make it easier to get started using the tool. Those three labels are tags, triggers, and variables. Each makes up a vital element of Tag Manager and has a section within the interface. You can see the links to access those sections highlighted in the image above.
What, though, is a tag, a trigger, and a variable?
Tags
Tags are critical to Tag Manager. Tags are snippets of code. They’re used by analytics and marketing platforms to integrate with sites and apps.
Google Analytics, for instance, uses tags to help it collect data on the users of different sites. Tag Manager exists to make it easier for you to create and implement these tags. The system works as an interface. Through it, you can create and publish tags without having to code them yourself.
It’s worth mentioning that these tags are distinct from the ones often spoken about by web developers. Developers use standard HTML tags to code webpages. Examples of those types of tags include <Head>, <Body>, <Blockquote> tags, and so on. We also call analytics and marketing code snippets tags as they’re often encapsulated by HTML <script> or <img> tags.
Tag Manager natively supports many different tag configurations. They include tags from Google products, as well as many from third-party platforms. You can also create custom tags if GTM doesn’t support the tag configuration you wish to use.
Google doesn’t recommend the use of custom tags. They suggest that you’re better off asking a tag provider to join their Tag Vendor Program. If you do want to use custom variants, however, you can create either HTML, image, or function tags. You can find full instructions on how to create them here.
Triggers
Tags in a website’s code will fire in response to a specified event. It’s a trigger that detects that event. Triggers ‘listen’ to your site or app and wait for specific events to occur. Examples of such events include page views, form submissions, and link clicks. When they detect the event that they’re looking for, triggers tell tags to fire.
When you create a new tag in GTM, one thing you must do is configure its trigger. You have a range of trigger types to choose between. Each one relates to the particular kind of event for which you want the tag to fire.
By default, a trigger you create causes a tag to fire every time the relevant event happens. You can, however, apply filters to a trigger to further specify when you need tags to fire and when you don’t.
For instance, you might add a filter that means a tag is only triggered to fire when the URL on which an event occurs has a specified suffix. That might be ‘/products’, ‘/blog,’ or something similar. That way, you can focus more closely on events taking place in particular areas of your site.
Variables
Variables in Tag Manager relate to both tags and triggers. They’re values to help precisely define what the tag or the trigger is supposed to do. The best way to explain variables is by looking in turn at how they work for triggers and tags.
In the case of triggers, variables specify when the trigger should tell its related tag to fire. For instance, you might configure a trigger to cause its tag to fire when the URL variable includes ‘website.com/products.’
When it comes to tags, their variables define the exact data the tag should collect. For example, you can configure a tag to extract a product ID and the monetary value related to a transaction. Tag Manager includes a wide range of Built-In Variables. They cover most of the basic needs you’ll have for trigger and tag configuration.
You can also create user-defined variables. You can create those variables to account for specific requirements you may have. That is assuming that the Built-In Variables don’t cover those requirements. We’ll talk more about the two types of variables a little later.
How to Create a Tag
There are lots of different things you can do via GTM. The main one is creating tags. These are the snippets of code which the service will implement across your chosen site or app for you. Once you’ve created a few of these tags, you’ll find it becomes like second nature.
To help you with your first, though, let’s work through the process step-by-step. The following instructions will take you through creating a Google Analytics tag for pageview hits. Such a tag will fire to send details of every pageview hit your site gets to your Analytics account.
If you create this type of tag, you’ll need to remove your existing Analytics Container from your site’s code. Having both embedded in a page’s code will cause duplicate page view hits. Such duplication ruins your data.
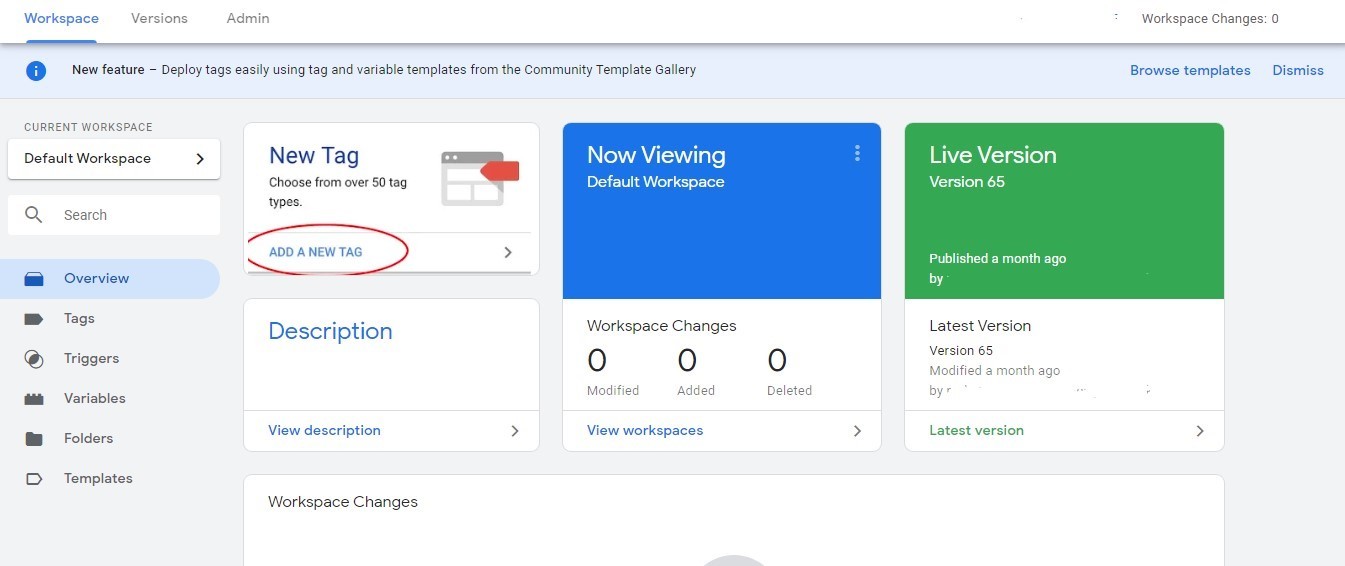
Your first step when creating a tag is to select the ‘Add a New Tag’ link from the GTM workspace, as shown below:
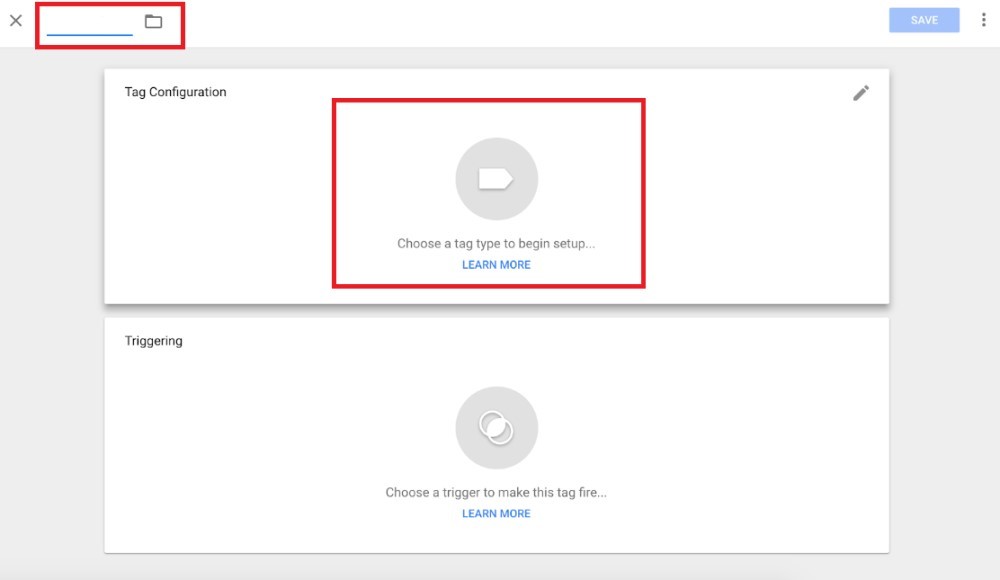
The next page you’ll see will be where you can configure your tag. Your first job is to give it a name. You can name your tags however you like. You will end up with a fair number of tags per site, though, so you need to be able to tell them apart. One helpful way to name tags is by adopting the following style:
Tag Type — Specific Tag — Unique Identifier.
For example, you would call a Google Analytics pageview tag; “UA (Universal Analytics) — Pageview — All Site Pages.” With a name entered, you can click the box which asks you to choose a tag type.
You’ll then see a list of available tag types. These are the tag configurations natively supported by GTM, which we mentioned earlier. Choose the configuration for the analytics or other platforms that you’re looking to integrate with your site. In the case of this example, that’s Google Analytics.
As we are creating an Analytics tag, we want that platform to track the tag. For that, you need to choose a ‘Track Type’ and then input your web property ID from Analytics. ‘Track Type’ is the specific kind of tag you want to create. In this example, we’re creating a pageview tag so you would choose the ‘pageview’ Track Type.
You have two different options for inputting your Analytics web property ID. Your first option is to input the IP manually for the tag. It’s easy to do, but you will have to repeat the process for each other Analytics tag you go on to set up.
To add the web property ID manually, you’ll first want to head to your Google Analytics account. Once there, open the Admin panel and choose ‘Property Settings.’ You’ll find your tracking ID in the space indicated below:
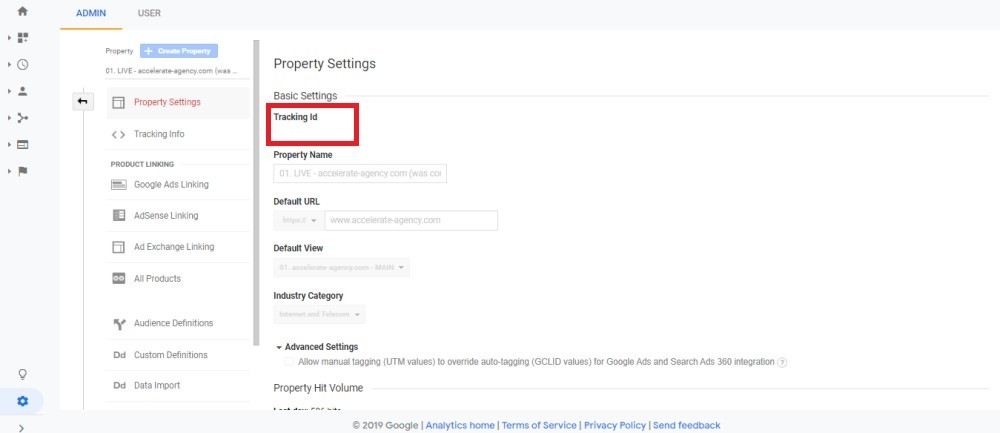
Heading back to GTM, make sure you check the box on your tag that reads ‘Enable overriding settings in this tag.’ You’ll see a field into which you can input your tracking ID. There is a second option for inputting the web property ID.
Rather than having to input the ID for each tag, you can create a custom variable. That variable will always contain the ID. You can add it to a tag with one click. As we mentioned earlier, GTM features two types of variables. If you’re going to create a custom tag, you should understand what each variable alternative is all about.
Built-in Variables
Built-in variables are the variables that GTM can automatically define for you. The tool can detect elements in the code of a tag and uses this to identify the variable.
The majority of the most common variable types are included in GTM. Those include those related to clicks or pages. You can add these variables via the ‘Built-in Variables’ area of the ‘Variables’ section of the GTM workspace.
User-Defined Variables
User-defined (or custom) variables will hold any value you define for them. That can be a numerical value, a specific name string, or a set of specified URLs. In the case of our example, it is the tracking ID associated with your Google Analytics account. Speaking of which, let’s get back to creating that custom variable for your first tag.
To create the variable for your tracking ID, head to the ‘Variable’s section within GTM. You’ll see a list of the built-in variables added for the property in question.

Scroll down, and you’ll reach the ‘User Defined Variables’ area of the page. Click ‘New,’ then choose the ‘Constant’ option for the variable’s configuration when prompted. After this, input your tracking ID as the variable’s value. All that’s left then is to click ‘Save,’ and your new variable is ready.
You can now head back to the tag you’re producing. This time, don’t check the ‘Enable overriding settings in this tag’ option. Instead, choose the custom variable you just created from the ‘Google Analytics Setting’ drop-down menu.
That’s your first tag created and configured. The last thing you have to do is configure the trigger. To configure the trigger for your first tag, click on the ‘Triggering’ box. There's a screenshot below:
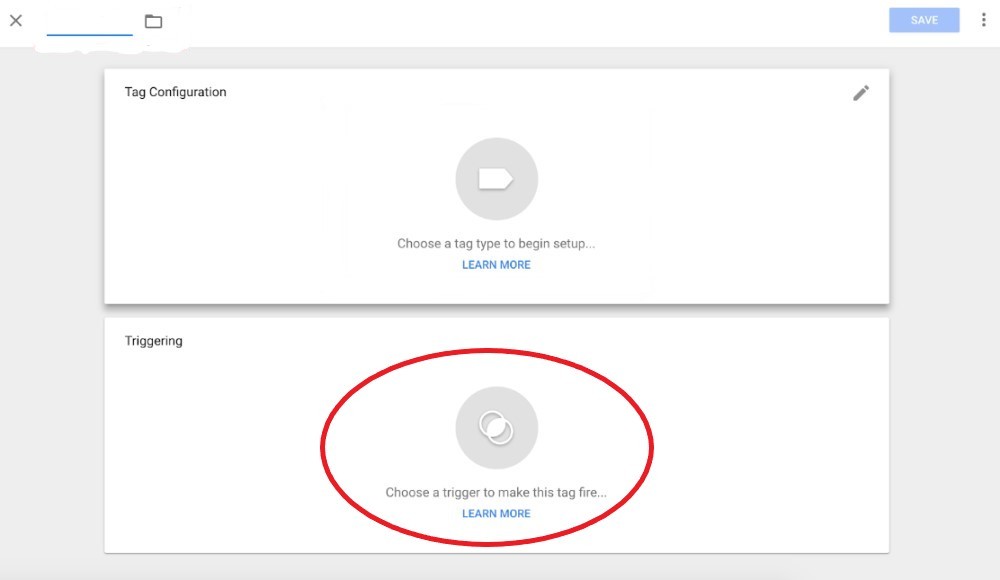
You’ll then see a page where you’re prompted to ‘Choose a trigger.’ Click the small ‘+’ icon toward the top right-hand corner of the page to create a new trigger. As with your tag, you first need to name the trigger. Give it a name related to its functionality. For instance, as we’re creating a pageview tag to fire for all pages on our site, we can name the trigger ‘All Pages.’
You then have the option to choose the trigger type. The trigger type will define the kind of event for which the trigger tells your tag to fire. In the case of a pageview trigger, you’ll want to select ‘pageview’ as the trigger type.
The final step is to select when the trigger tells your tag to fire. Your options are to either have it fire for all pages or only for particular pages. Our generic, first tag is going to apply to all pages on our site. As such, you’d choose the ‘All Page Views’ option.
That covers how to configure your first tag and its trigger. Now click ‘Save.’ You’ll be able to see the tag – along with any others you create — in the ‘Tags’ area of your GTM workspace:
While you’ve created your tag, it’s not yet live on your site. You need to publish your new tag for it to start collecting data and sending it to your Google Analytics. Before you do publish the tag, it makes sense testing it through GTM and debugging any problems you find.
Testing with GTM and Debugging Your Tag
Like all the best tools for Google Analytics, GTM is user-friendly from end-to-end. It is straightforward to test your tags. All you need to do is click the 'Preview' button at the top right-hand side of your main workspace. You'll then see a banner across the top of the workspace, telling you that preview mode is active.
If you now navigate to your website on a new tab, you'll see a GTM console window for debugging tags. It's at the bottom of your browser. The window displays information on the tags related to the webpage you're on. Most importantly, it tells you if the tags fired or not, as well as what data they passed to their respective platforms (Analytics, etc.).
The first pageview tag you created should fire as soon as you visit one of your site's pages. If you can see that it did in the console window, you're ready to publish the tag. If it didn't fire, you need to find out why and fix any issue. The way to do this is by clicking into the tag within that console window.
When you click any tag in the preview window, you'll see the 'firing triggers' for the tag. These are the factors that determine if the trigger tells the tag to fire. When a tag hasn't fired, you'll see a red 'X' next to the firing trigger filter. If you think the tag should have fired, that red 'X' is vital. It shows you the element of the trigger configuration that you need to go back and change.
Once you're happy your tag is working, you can publish it on your website. From the main GTM workspace, click the 'Submit' button in the top right-hand corner:
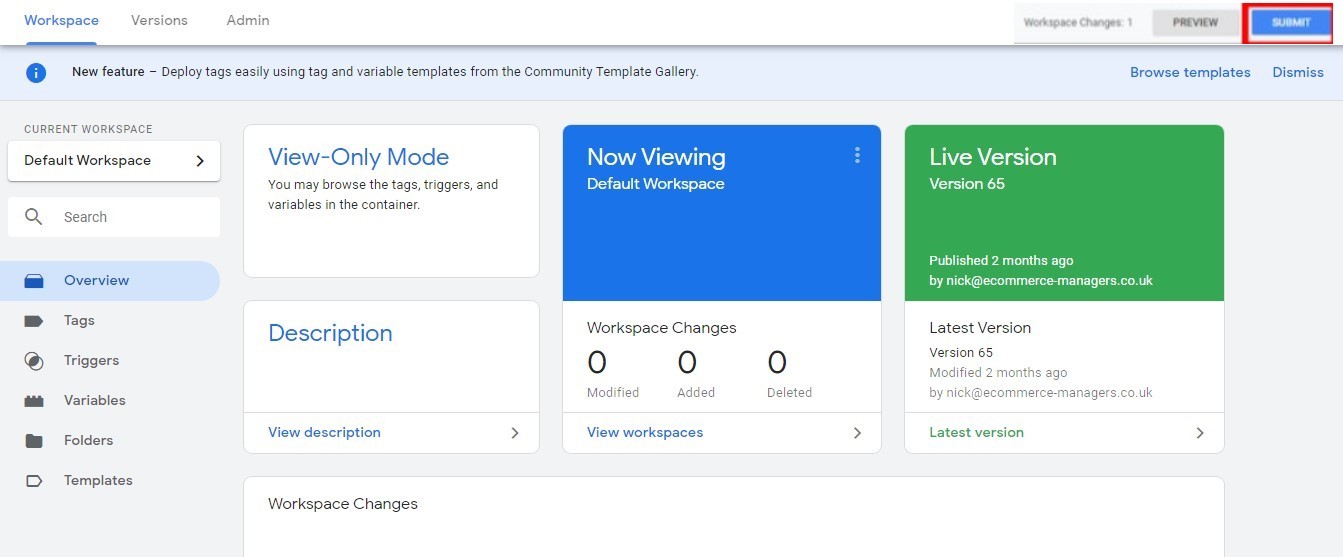
By clicking ‘Submit,’ you’re publishing a new version of your container, complete with the tag you’ve added to it. You’ll need to give the container version a name and to provide a description. You can use those two elements to explain the changes you’ve made. That way, you can remind yourself or show other users of the GTM container what you did and when.
Your final step is then to click ‘Publish.’ That tag should now fire and send data to your Analytics account as per the settings you defined. It’s worth checking now that it is working correctly.
Best Extensions for GTM
This guide aims to get you started with Google Tag Manager. By reading the above, you should also have mastered the basics of setting up GTM and creating tags. When you get more familiar with it, though, you may want to get a little more out of GTM.
There is a wide range of tools and extensions you can get your hands on, which help you do just that. Two of the best extensions around are Tag Assistant and GTM Debug. They’re both Chrome browser extensions designed to help support your use of GTM.
Tag Assistant is Google’s extension for troubleshooting your use of tags. With Tag Assistant installed, you can go to any page on your site, and the extension will ID the tags that are present. It will report any errors with those tags and give you suggestions for fixing those errors.
GTM Debug is a similar tool. It lets you easily view event data, and Analytics hits related to any of your pages. You can also use it to view and debug your page’s tags in a similar way as we described via GTM’s preview function. In the case of GTM Debug, though, it’s only tags that are already live that you can assess.
GTM; Helping You Organize, Implement & Inventory Your Tags
If you own a website or are a webmaster, you know how important it is to collect accurate data. Data informs every aspect of your business. The insights delivered by accurate data help you make the right marketing decisions. Those insights also help ensure that your site is performing as it should.
Tags — those little snippets of code you add to your pages — are critical in ensuring you get this data. It’s possible to code, implement, and organize all the tags you need yourself. Doing so, though, is time-consuming, complicated, and prone to errors. Google Tag Manager exists to make it much easier to keep all your tags in order.
GTM is an interface through which you can quickly manage the use of tags on any site or sites. It simplifies the process of creating those tags and adding them to your pages for you. What’s more, it ensures you always have a complete inventory of the tags you’re using, close at hand. If you’re serious about your site’s analytics, you can’t do without GTM.
Innovative SEO services
SEO is a patience game; no secret there. We`ll work with you to develop a Search strategy focused on producing increased traffic rankings in as early as 3-months.
A proven Allinclusive. SEO services for measuring, executing, and optimizing for Search Engine success. We say what we do and do what we say.
Our company as Semrush Agency Partner has designed a search engine optimization service that is both ethical and result-driven. We use the latest tools, strategies, and trends to help you move up in the search engines for the right keywords to get noticed by the right audience.
Today, you can schedule a Discovery call with us about your company needs.
Source:

