Migrating a website can be a problem-solving necessity—but it can also be risky.
Issues you may face range from losing ranks on search engines to completely losing parts of your website. Ouch.
Despite the potential technical trouble, you’re brave, tech-savvy, and up for the challenge.
And we’re here to help you mitigate the risks with our website migration checklist. We’ll list the most important steps to take to migrate a website, along with advice from SEO professionals to keep your migration SEO-friendly.
At the bottom of the page, you can also customize your own unique checklist based on your website’s specific needs.
But first, a few basics.
What Is Website Migration?
Website migration is the process of making major changes to a website’s technology, structure, design, or location in order to have better online visibility.
Migration implies serious changes. It’s a challenging process, and you need a really good reason to take it on (we think you have one since you’ve read this far). Some of the most common reasons to migrate a website include:
Changing your site’s structure, navigation, or design: For when your old design needs a refresh. Or maybe your site structure and navigation scare crawlers away. Moving to a new framework or CMS: You might do this if you want to improve your site’s performance, security, or even functionality. Adding a mobile version: A mobile version of your site is important for anyone visiting on a tablet or cellphone. Moving from HTTP to HTTPS: No one wants to visit a site after a scary pop-up tells them that it’s not safe to browse. Switching from HTTP to HTTPS helps secure your site by encrypting visitors’ information and warding off scary notices. Moving to a new server: Switching to a new host could speed up your site overall, especially if it’s growing. A speedy site looks good to visitors and to search engines. Changing your domain name: Maybe you’re changing your domain name as a part of rebranding. Changing your domain name involves a site migration.Does Website Migration Affect SEO?
As with any drastic change, website migration affects SEO. However, migrating for the right reason can create a better and safer experience for site visitors.
Google favors fast, user-friendly websites. So, switching to a speedier web host could boost your SEO in the long term.
Moving your site means Google has to re-index it, so it’s normal to see a dip in your organic traffic in the short term.
Ultimately, having a solid website migration plan can help you keep your current SERP positions and even start moving in the right direction.
A key piece of advice is when you’re planning your migrations definitely consider SEO as part of it.
Ric Rodriguez, SEO Director at iProspect
We talked to a handful of SEO professionals about their experience with site migrations. Check out what they had to say below!
Site Migration Checklist Part 1: Prepare Your Plan
Let’s start at the very beginning, with how you should build your plan:
1. Plan the Move and Benchmark Your Current Site
The biggest and most common mistake people make when migrating a website is a lack of careful planning. Another frequent reason for failure is underestimating the scope of the work and required expertise.
The earlier you can get in the better. You’re going to need all the time you can get…even the simplest migrations have a tendency not to go very straightforward. Also, don’t underestimate the scale of some of the larger projects and how they may grow.
David Sayce, Digital Marketing Consultant at Paper Gecko
So, what are your first actions to take?
Set the objectives. Ask yourself why you are migrating and when you want it done. Estimate the timeline. You can use our checklist to lay out milestones. Get help. Make sure you have webmaster engineers, SEOs, analysts, UX, and content specialists on your team.Data Collection
The next important preparation step is collecting the data for reference and analysis. You can use various analytical tools, but in our checklist, we’ll primarily use Google tools and the Semrush suite.
We recommend that you create a project and set up analytical tools for your current website to have a point of reference.
Site Audit to check on the website’s health Position Tracking to monitor rankings Content Audit to audit the website's content2. Make a Copy of Your Site
In order for you to be able to test and revise all of the changes you will make, you’ll need a copy of your website uploaded to a new server.
It’s a good idea to use a test site on a separate domain or subdomain so that you can compare your new site to the existing version and tweak it before launch.
If you are using a content delivery network (CDN), remember to set it up for the test site.
3. Block Access to Your New Site
You need to prevent search engines from indexing the new version of your website before you finish the migration. Otherwise, it could appear on SERPs and compete with the existing version.
Robots.txt
Creating a robots.txt file is an easy way of blocking search engines from crawling. But you have to remember to grant access to the tools that will be used during the migration.
To block Google and give access to Semrush Site Audit, your robots.txt must have the following directives:
User-agent: Googlebot
Disallow: /
User-agent: Semrushbot-SA
Allow: /
Password Protection
Another way of blocking access to the website under development is setting authorization rules. You can allow Site Audit to bypass the restrictions without disabling your password protection, just enter the credentials in the tool’s settings.
Noindex Tag
Using the noindex tag also prevents bots from crawling, and you’ll need to delete said tag before migrating. So, make a list of URLs with the noindex tag beforehand.
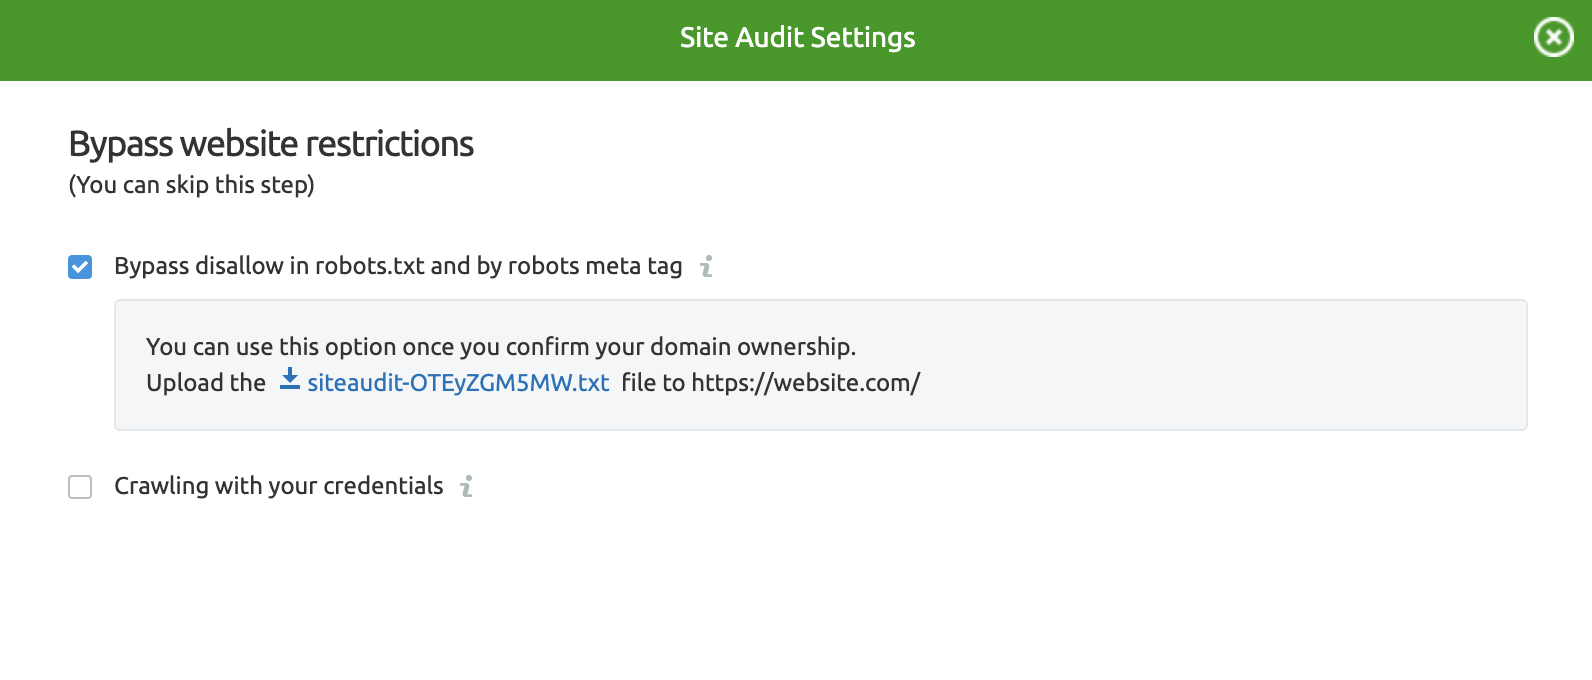
As for Site Audit’s crawlers, you can still crawl your site with a noindex in place by using the “Bypass disallow in robots.txt and by robots meta tag” option from the Bypass website restrictions tab in settings.
4. Check Your New Site for Errors
Before launching the new version of a website you should check it for technical errors.
We recommend setting up a new Site Audit project with your test domain or subdomain in crawl scope and looking out for critical errors.
First, you'll need to select the crawl scope settings.
If you are using a subdomain for the test site, click the pencil icon to specify it. Select the limit of checked pages. You’ll need enough to cover your whole website. Leave Website as the crawl source for now. This setting also allows you to use Sitemaps or other lists of URLs as the crawl source, which will come in handy in the future steps of website migration.You can leave other options as default, although if your website is blocked by the password or blocks crawlers in robots.txt, you may want to enter your credentials or confirm your ownership of the website in the “bypass website restrictions” option.
Click “Start Site Audit” for the tool to begin scanning the pages of your site for all kinds of errors.
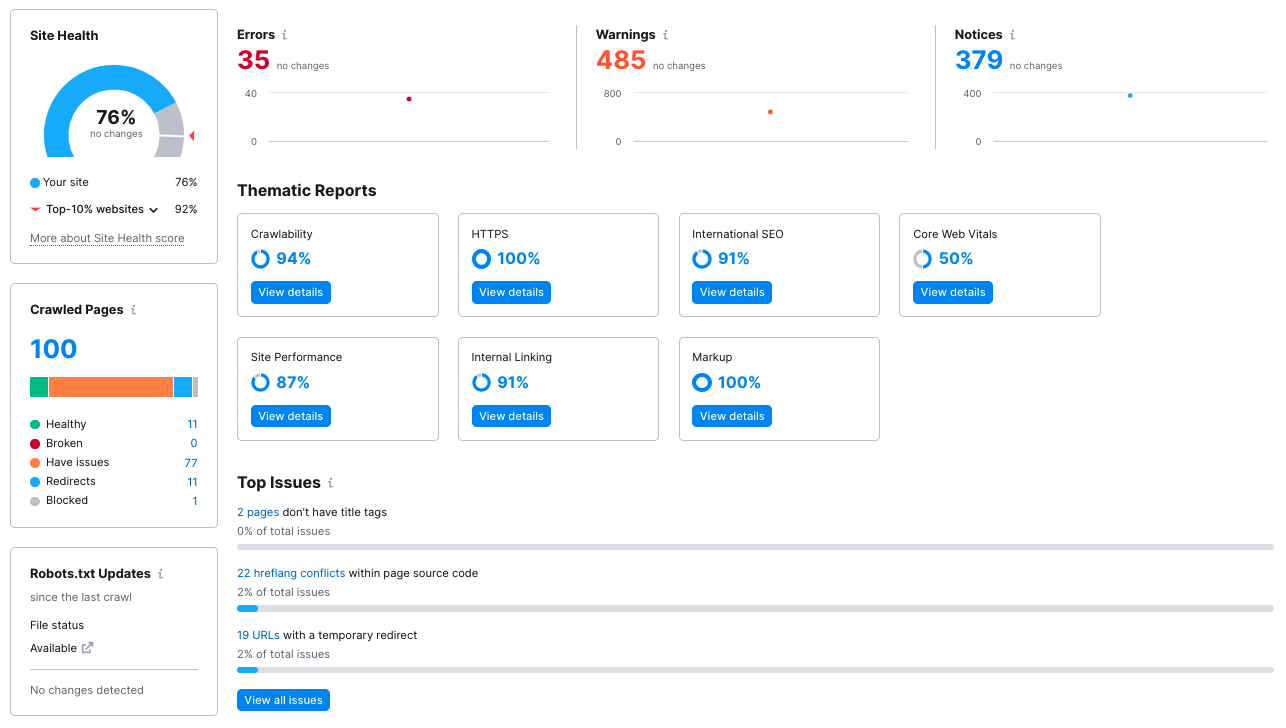
The Site Audit overview presents the total number of issues found and the overall site health score of a website. You’ll also see the top issues of your website. You can start by fixing these, going through the thematic reports, or going to the Issues tab to see the full list of issues.
Use the Crawled pages tab to see how the bot crawls your website and if your site architecture works well.
You’ll be able to change the settings of your Site Audit campaign in the future by clicking the gear icon in the top right corner.
For example, to check if your website works well on both desktop and mobile platforms you can switch to mobile user-agent; although, we strongly recommend you set up a separate Site Audit project for mobile, so that you will have the historical data for each platform. This is a must if you are implementing a mobile version of a website.
For a test site, you can simply change the selected user agent in the settings and re-run the campaign. But please be aware that comparing crawls with different settings is impractical, and you will not be able to monitor the progress as you will have mixed historical data.
5. Check If Google Can Access Your New Site
To make sure that Googlebot can access your new website, add the temporary hostname of your test subdomain to Search Console and use the Coverage report. This will also ensure that JavaScript can be crawled and indexed.
Note that you will have to temporarily give Googlebot access to your test site. We recommend restricting the access shortly after you’ve made sure your test site has no indexing issues.
The Site Audit crawler has a similar logic to the Googlebot, so go ahead and inspect the Crawlability report to see if our tool finds any non-indexable pages or crawl budget waste.
6. Check If Your Newly Acquired Domain Was Penalized by Google
If you’ve purchased a new domain recently, you should check if it has any manual actions issued against it. Go to the Manual Actions report in Search Console to view the site’s manual action history and make sure that there are no current issues, or address any existing problems by following Google’s recommendations.
7. Check DNS TTL Values
Most of your visitors use your site name and not the IP address to enter your site, but computers need IPs to serve up websites. A domain naming system (DNS) translates site names into IP addresses.
If the migration of your website requires a change of IP address, your DNS records will require an update, which will result in downtime for your site. To minimize the downtime, you can tweak the time-to-live (TTL) values of the DNS entries of your website.
The TTL values specify how long the DNS record is kept; it’s an expiration date of sorts. Lowering the TTL value before migration will speed up the process of DNS change. Once migration is complete, you can set the values back.
8. Check Server Performance
Googlebot will have to recrawl your new website, and it’s in your best interest for it to be done as quickly as possible. If your server response time is slow, then Googlebot will slow down its crawling rate, so it will take much longer to recrawl the whole website. It will also negatively affect the overall performance of your site, no matter how well it is optimized.
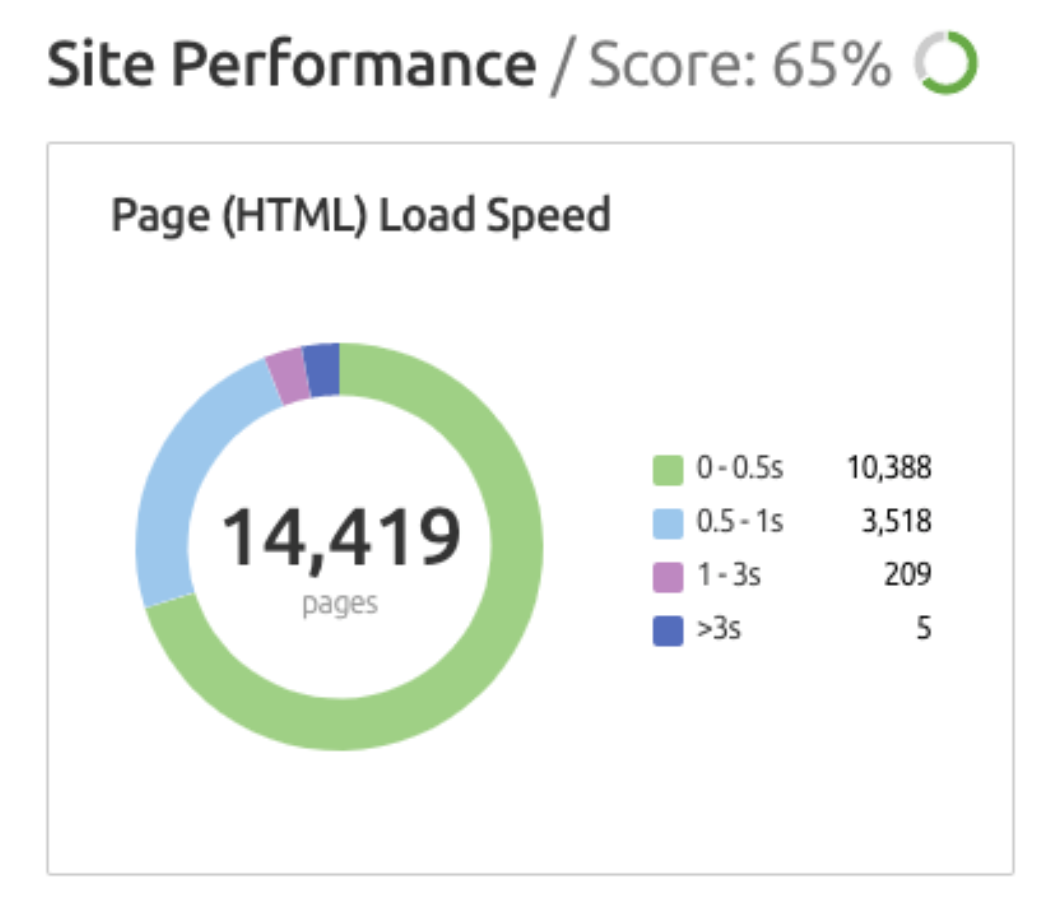
To make sure all of the pages of your site are fast loading, go to the Performance report in the Site Audit tool and use the Page (HTML) Load Speed widget.
I generally start every migration project with a full website audit. This gives you the benchmark before the audit that you can use (once you’ve completed it) to make sure that you are on track, that your visibility is still up there, and that you haven’t missed anything.
David Sayce, Digital Marketing Consultant at Paper Gecko
The ring chart is clickable, and you can use it to generate a report for the pages with a specific load speed range.
9. Copy the GA Tracking Code to Your New Site
To transfer your historical Google Analytics data to your new site, you will need to copy your GA tracking code from an existing site and implement it on the new version.
Site Migration Checklist Part 2: Mapping URLs
After a careful planning session, you’ll need to move on to mapping URLs. This means keeping a list of all your current URLs to match up with the ones after the big move. It’s also crucial to redirect correctly or you could face some serious SEO consequences.
Different tools can help smooth out the kinks in this process. Google Search Console can help you index pages. Also, Site Audit makes it easier to see error codes on your current site and make sure there are none on your revamped site.
10. Create a List of Your Current URLs
First things first, you’ll need a list of the URLs of your existing site to match them with the URLs of your new site.
You’ll want to find the most important pages of your site, content-wise, traffic-wise, and link-wise.
Start with your sitemaps, if they have up-to-date page information. You need to gather all of the content (including images and video) that you want to be available on your new site.
You can use different sources:
Use Search Console to find all of the index pages With Google Analytics you can find the pages that have traffic In Site Audit you can filter out pages with a specific status code In Backlink Аnalytics you will find the pages of your site with backlinks In Position Tracking you can sort out the high-ranking pages of your websiteYou can create multiple lists, but to simplify your future steps, we recommend you merge all of the data into one file. Make sure there are no duplicate URLs in your list.
…I worked on a large-scale migration in which SEO was almost seen as a step-by-step process of checks towards the end of the migration, well, the different intervals of migration.
The end result being there were duplicates of the site based on the technical foundations of the site as a whole…
Harry Sumner, SEO Director at iProspect
11. Find URLs That Require Redirects
If the URL structure of your new site changes, you’ll need to match your old URLs with the new ones to see if any of the pages require a 301 redirect. Without a proper redirection, your new pages will not get the traffic and PageRank of the old pages, which will affect your rankings severely.
I once was called upon a failed migration and they did all the right redirects, they did all the research and everything but still, they lost an enormous amount of traffic due to lost rankings.
So the thing that happened, in this case, was there was an automatic redirect based on the language.
It was a Belgian site and they basically either redirected to the Dutch version or to the French version or to the English version but they were all, like, question mark lang is, FR or whatever.
They forgot to redirect all of these pages and as such, they’d redirect all of the pages that would come out of a crawler but they wouldn’t redirect the ones that users actually linked to. So just fixing those solved the problem, and they regained their rankings within a few weeks.
So, lesson learned, always look at all the pages that get you traffic, that rank, to create your redirects.
Arnout Hellemans, Freelance SEO consultant
You can use Site Audit to find out if all of the pages you want on a new site are available. Remember to use the Bypass website restrictions option if your site is blocked by the password or blocks crawlers in robots.txt
Use the existing Site Audit project for your test site, or create a new project if you don’t have one.
Use the URLs from the file option in the Crawl source settings, and upload a CSV file with the list of relative URLs you need to check. Site Audit will automatically use the domain or a subdomain of your test site.
You can change the Crawl limit of an existing project in the Settings (gear icon) -> Limit of checked pages.
In the Issues tab of Site Audit search “4xx” to sort out the URLs of pages unavailable on your test site.

Export the data to save the list of URLs that need a redirect.
12. Create a 301 Redirect Map
Once you’ve mapped the URLs of your old and new websites and found which pages are missing from your new site, you’ll need to address the missing URLs.
For each of your missing pages, you need to find a relevant destination on your new site to receive referral traffic from any existing hyperlinks pointing to those pages.
We urge you to be careful when setting up redirects and use a server-side 301 redirect so that your old URLs will be excluded from the index and your redirects will still be working when you cancel your current hosting.
Here’s another one that I quite regularly bump into, is that people think they can remove redirects the moment Google has picked up on the new URLs or the new domain or whatever it is.
You should never be doing that.
A 301 redirect is a permanent redirect. That means it needs to stay there. Well, that’s my way of looking at it. Google never forgets, so just keep it there, make sure you redirect everything.
Don’t have double hops in your redirects. So if there are old redirects now going to the HTTP version, which redirects to an HTTPS version, which does whatever, make it a single hop, and just a single 301 redirect…Don’t remove them after your pages have been migrated.
Arnout Hellemans, Freelance SEO consultant
Don’t redirect all of your pages to a single page. While it’s quite common to use the main page as a destination for redirects, it’s also bad practice. Landing on a homepage when you’re expecting a specific article or landing page confuses users, and search engines may consider the page a soft 404 error, which hurts rankings.
In some cases, redirecting to a category page or the main page is a viable option, but try to minimize these.
The best way is to find the most relevant page for a redirect or create a new page with relevant content.
If you don’t need a new page, we recommend you change the server response of a broken page from 404 to 410. The 410 status code means that the page is permanently gone, and tells the search engine bots to remove the link from their index.
Careless redirects can end up creating redirect loops, chains, and dead ends. You can always re-run your Site Audit campaign to find out if everything works well.
13. Update All URLs
The last thing to do before you can start the migration is to update all URL details.
Update annotations in the HTML or the Sitemap file. Each URL should have a self-referencing rel="canonical". Update the rel-alternate-hreflang annotations if your website has multilingual pages. Update the rel-alternate-media annotations if your website has a mobile version. Update all internal links on a new site, and change all of the old URLs to the new URLs. Create a list of websites linking to your content and separate Sitemaps with old and new URLs. These will facilitate your site move in the future steps.Site Migration Checklist Part 3: Starting the Migration
All your planning adds up to this moment—actually migrating your site.
Take a deep breath. It should go smoothly with your strong website migration plan. The main point here is to implement changes, test, and then test again.
14. Evaluate the Complexity and Migrate in Chunks
Different pages of your website can have different issues when it comes to migration. Therefore, the more pages you move at once, the more likely it is that you will face mistakes, and it will be much harder to determine the cause.
If you have a large website, we recommend that you move the website bit by bit and perform tests after each move.
It can also be problematic when there are several changes at once: new CMS, different URL structure, content changes, HTTP to HTTPS, etc. Each change introduces a new variable and something else to be managed (and potentially messed up)...
As a golden rule, keep it as simple as possible. Try not to make multiple changes at once. Never change URLs if you can help it. Do the analysis and put clear plans in place as, ultimately, failing to plan is planning to fail.
Marcus Miller, Marketing Director at BowlerHat Agency
15. Record the Current Site Status and Create a Content Backup
Make a final record of your current site status and make all necessary backups so that you can analyze and fix problems in case anything goes wrong.
You’ll need to back up all of your content, including meta tags, meta titles, etc. Learning how to back up all of your site’s content could be a new post in itself.
How you’ll back up your site depends on how it’s hosted. You might be able to do it through your site host’s cPanel. If you have a CMS like WordPress, you might be able to use a plug-in.
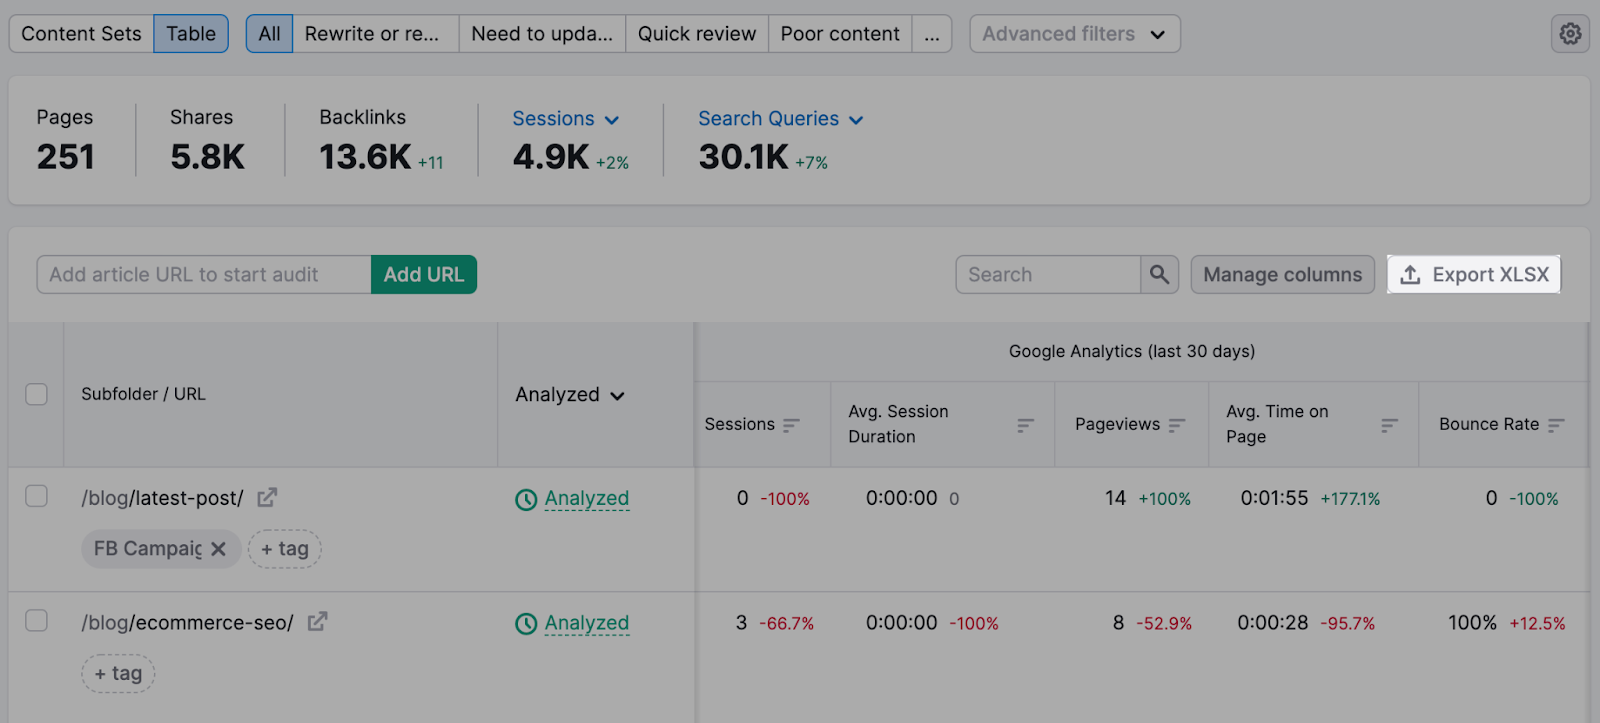
But the easiest option is to just export your Content Audit report.
Make sure your Position Tracking and Site Audit campaigns are set up and updated.
16. Update DNS Settings
If you are switching to a new server, you need to change your DNS settings so it will point to the new IP address. To do this you need to contact your hosting company and request the change.
17. Remove All Temporary Website Blocks
Make sure your website is available for users and search engine crawlers. Use the Coverage report in Google Search Console and the Crawlability report in Site Audit.
18. Enable Redirection
At this point, you can enable and test all your redirects, if you haven’t done so already.
Re-run your Site Audit campaign to make sure there are no new 4xx errors in the Issues tab. Then, you can sort the Issues tab for Permanent redirects, and go over the list to make sure that all page and link URLs are correct.
19. Make Sure Your Website is Verified within Google Search Console
You need to check if your website ownership is still valid after the move in Google Search Console (GSC) settings.
If you’re using an HTML file as a verification method, make sure that your new website contains the file.
20. Request a Domain Change via GSC
To help Google index your new URLs at the new address, and minimize your ranking loss, you need to submit a change of address in the “change of address” tool in Search Console.
21. Send Old and New URLs to GSC
To help Googlebot discover the redirects from the old URLs to the new URLs, you can submit two sitemaps containing the old and new URLs. This way you will be able to monitor how your old URLs are being removed and the new ones added to the index. Finally, only the new URLs should remain indexed.
22. Update All Your Links (Ad Campaigns, Backlinks, Etc.)
You need to try and update as many links as you can as soon as possible after the move.
Reach out to the sites that link to you and ask to change the links to your new site. If this isn’t possible, make sure that a 301 redirect is in place.
If you’re running ad campaigns, make sure they point to the new landing pages. Also, check the links in your social media profiles.
Use Site Audit to find all internal links with redirects; make sure there are no loops and long chains affecting your site performance.
...Create a comprehensive playbook for you and your team and for the rest of the parties involved in this kind of project. Divide it into three areas, the technical, the onsite, and the post-release.
For example, make sure that you’re going to implement 301 redirects, make sure you’re going to update canonical tags [and] the hreflangs, you update the internal linking, but you’re also going to generate a new XML sitemap with the old HTTP pages.
Lefto Chatziandreou, Global SEO at CarRentals.com
23. Resubmit Any Disavowed Links to GSC
If you have a new Search Console account and previously submitted a disavow list, you’ll need to re-upload your disavow list. Make sure your disavow file is available on your new site, otherwise any spammy backlinks to your previous site could be taken into account by Google.
Site Migration Checklist Part 4: Monitoring the Migration
Your work here isn’t done after you’ve moved your site. You still have to monitor and maintain your site’s health, just like with our own health after a successful operation. Adding Semrush Notes and using Position Tracking on Semrush can set you up to monitor your SEO from here on out.
24. Add a Semrush Note
The first thing we recommend you do in Semrush after the migration is to make a note in your account. You’ll see this note on graphs across different tools within your account, and it will make it easier to see if any major changes occurred at the time of the move; for example, monitoring technical errors and position changes.
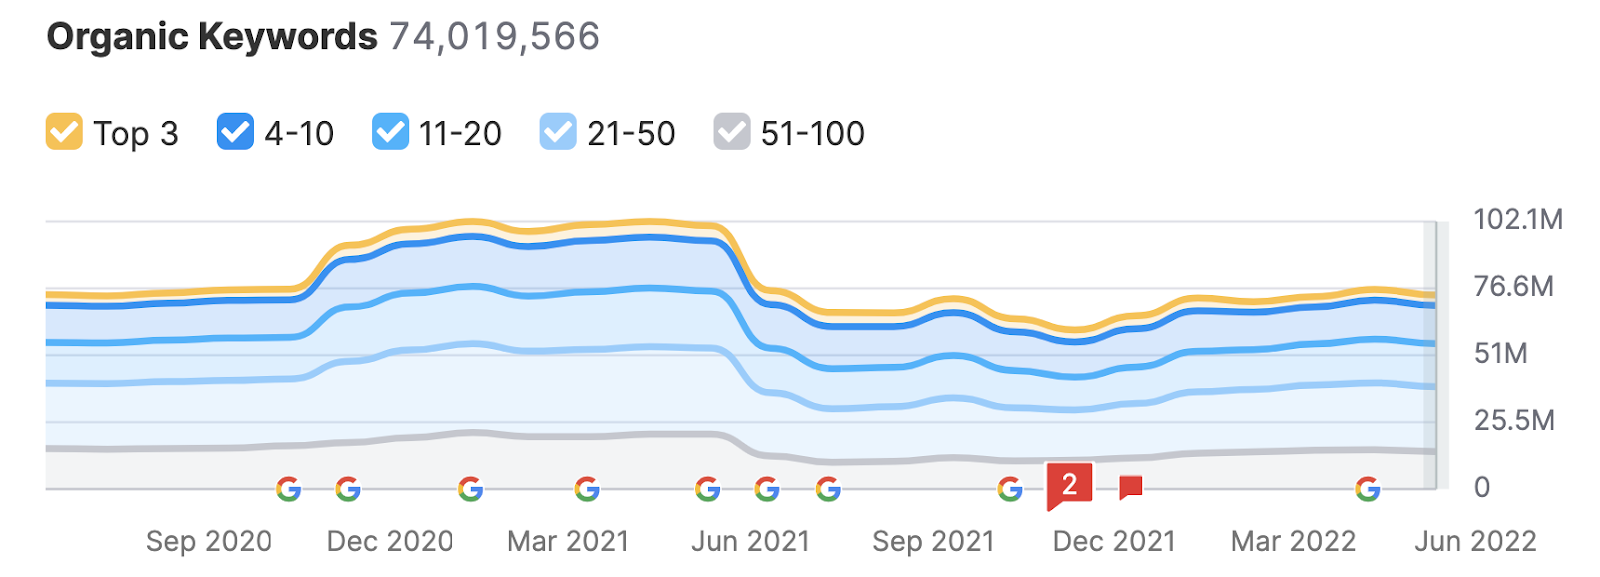
You can add and manage notes in the Notes list or in the tools’ progress graphs. Click the Add button to start Note Manager. Add a title and select the date of migration. Then, click Edit to open the advanced settings, and specify the tools you want to see a note in.
25. Check If Your Site Has Any New Issues
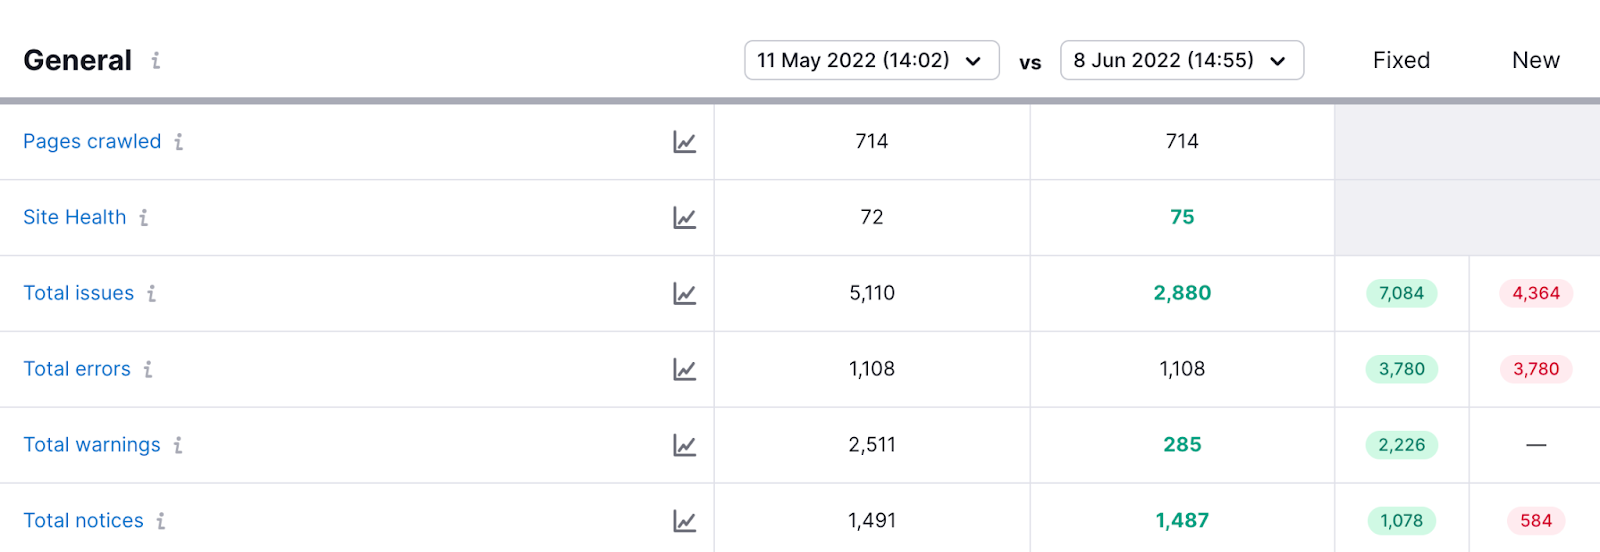
Rerun your Site Audit campaign after the move, and see if the number of issues has changed.
Check the Compare Crawl tabs to see if there are any New or Fixed issues since the last audit.
26. Check the Performance of Your New Site
Page load speed is always important, but you need to pay special attention to it in the case of a new site. You want all of your pages to be indexed as quickly as possible. Make sure your server is fast, as Googlebot adjusts its crawling pace to your website speed.
Post-release, monitor and analyze your server logs, see where Google is spending more time. Monitor and analyze the deindexation of the HTTP pages and the indexation of the HTTPS through Google Search Console.
Lefto Chatziandreou, Global SEO at CarRentals.com
Even if you’ve done all of the previous steps correctly, and have already checked the performance of your website, you should still recheck it just in case. You need to make sure your new site configuration is not overburdened with a full load of user and crawler activities.
Once again, use an up-to-date recrawl of Site Audit and inspect the Performance report.
To see how quickly your real users interact with your pages, use the Site Speed report in Google Analytics. Real users with different browsers may experience more speed-related issues than crawlers.
27. Track Indexing of Your New Pages
If you haven’t done so already, upload two Sitemaps with the old and new URLs to Google Search Console. This way you will be able to monitor how your old URLs are being removed and the new ones added to the index. Finally, only the new URLs should remain indexed.
28. Track Your Positions
After the migration, your site may suffer temporary drops in rankings, but it should get back on track soon enough. If your website doesn’t recover in a couple of weeks, you should perform a thorough analysis to figure out the cause. See more on this in the troubleshooting section.
Don't forget to track daily rankings across both desktop and mobile.
...Take a look at the organic traffic that you’re attracting…Ideally, everything should be flat, meaning no negative impact from that but not much positive, at least in the beginning. If you see any kind of abnormalities try to analyze that and figure out the root cause of that.
Lefto Chatziandreou, Global SEO at CarRentals.com
29. Cancel Your Old Hosting
When Google finishes indexing your new website, you can cancel your old hosting. Once again, make sure that all your 301 redirects are set up properly and are redirecting people away from a discontinued server.
30. Troubleshooting
If you notice anything wrong with the way your audience is behaving, or if you haven't regained your positions and organic traffic income, go over these steps to troubleshoot your issues:
First, find out if you are losing traffic evenly across all pages of your website, or if it is caused by specific pages. Find out the source of lost traffic. If you’ve lost traffic from backlinks or ads, recheck the redirects. If you’ve lost organic traffic, check if your rankings are ok by inspecting your Position Tracking campaign. If the issue affects many pages across the website, re-run Site Audit to find out if any new technical issues are causing trouble. Follow the tool’s instructions to fix them. If you have specific pages that have lost positions, look at the backup of your content, and see if there are any changes in content and meta tags.To get optimization ideas for underperforming pages, you can run On Page SEO Checker.
If your conversion rates drop, while bounce and exit rates are growing, you may need to change your approach. Unfortunately, it’s not always technical errors that cause trouble.
You have to take into account the possibility that your audience may not be satisfied with your new website. Create a customer journey map, and see if the users get what they are looking for on your website.
If you have checked everything on your side, and still can't figure out what's wrong, try seeking answers on the Google Webmaster Help Forum.
Create Your Own Custom Migration Checklist
Conclusion: Recap of Website Migration Best Strategies
The biggest takeaway is that the key to a smooth transition is careful planning and testing. As a recap:
Try not to migrate the entire site at once. First, create a test sample of a new site. When you are sure that everything works right, start moving your website piece by piece. Avoid mixing multiple migration types in a single move. For example, if you want to change your domain name, switch to a new host, and redesign your site architecture, we recommend that you focus on those one at a time. Migrate during a low-traffic time if possible; this will minimize the impact in case something goes wrong. Plus, a reduced server load will allow GoogleBot to crawl and index your new website faster. Hope for the best, but prepare for the worst. Website migration is a serious undertaking that has a lot of potential issues and pitfalls. Use our checklist along the way to facilitate the process. And remember—planning and testing!It’s a tough job, but it’s just as rewarding when you see the results. Careful consideration and even more careful migration will keep your site in Google’s good graces. Start your custom checklist now to map your journey and stay on track.
Innovative SEO services
SEO is a patience game; no secret there. We`ll work with you to develop a Search strategy focused on producing increased traffic rankings in as early as 3-months.
A proven Allinclusive. SEO services for measuring, executing, and optimizing for Search Engine success. We say what we do and do what we say.
Our company as Semrush Agency Partner has designed a search engine optimization service that is both ethical and result-driven. We use the latest tools, strategies, and trends to help you move up in the search engines for the right keywords to get noticed by the right audience.
Today, you can schedule a Discovery call with us about your company needs.
Source:


