Website speed matters.How often have you hit the back button yourself on your mobile phone because you were waiting... and waiting.... and waiting for a website to load?
Bounce rate, time on site, and pages per sessions are all important ranking factors of 2017.If you have a slow website, it takes forever to load (I’m talking 3 seconds or more), or if it is not optimized for mobile use, then your mobile visitors are less likely to stick around.
With mobile searches outnumbering desktop searches in 2016, it is no wonder Google started the AMP project. Let’s look at what AMP exactly is, why you may want it for your WordPress (or wp) website, how to set up AMP on your WordPress site, and how to check to make sure AMP is implemented properly.
Why You Want AMP for WordPress
Google is pushing hard for AMP, which is why AMP pages are dominating the search results on mobile phones. If you want to still be competitive for mobile search results, or show up in snippet features in Google on mobile devices, then you want to seriously consider updating your site to include AMP.
You can see in the example below, the first result and the carousel are all AMP (you can see this by the little lightening bolt in the top right corner in the screenshot below.)

What is AMP (& a Short History)
AMP stands for “Accelerated Mobile Pages”, and that is exactly what it does. It is a simple type of HTML code that cuts down on a lot of heavy, fancy stuff that can increase load time of a website on mobile.
There are limitations to AMP HTML compared to regular HTML.For example, no Javascript is allowed, no external CSS, and there are some HTML tags that aren’t allowed (but some are replaced with special AMP HTML tags).
Google started the AMP Project in 2015 (probably when it realized the trend of mobile searches compared to desktop searches) in order to help large publishers (like Forbes and CNN) decrease their page load time on mobile, helping to increase time on site, drop bounce rate, and improve user experience.
When you implement AMP on your website, you are basically creating a special AMP page that is very similar to the original page.Except that it is built with the AMP HTML code, it can be cached on Google’s server for almost instant load speed, and creates a better user experience.
For more information about how AMP works, I recommend checking out this video from the AMP Project.
Now if you don’t know code (and I know some of us utilize WordPress because we don’t need to be programmers), this may have made your brain melt a bit (I know mine did). That is ok! There are WordPress plugins specifically for implementing AMP, so let’s take a look at how to set up AMP for WP without any coding required.
Setting Up AMP for Your WP Website
I recommend using AMP for WordPress - Accelerated Mobile Pages for a few reasons. It is easy to implement, has a lot of installations, and good reviews (so the chances of it interfering with your theme or the plugins you have installed are less likely). However, that doesn’t mean you don't need to take the proper steps in order to successfully set up AMP.
Create a Backup and/or Clone of Your Website
Creating a backup of your website is something you should do regularly, and I highly recommend doing it anytime you are installing a new plugin or theme. This is in case there are any compatibility issues with plugins or themes that are already installed on your site.If there are issues, and your site breaks, you can quickly restore it back to its original state, and troubleshoot it what went wrong.
Creating a backup is also necessary if you want to clone your site on your server to a development site. This is completely optional, but it is a great way to update your site to AMP instantly and avoid any downtime or errors coming up while you are setting up your AMP settings.
To clone your site, you basically take a copy of the current site, upload it to a server that is not public (you want to make sure Google is blocked from crawling it so it doesn't appear in search results), add the AMP plugin, activate it, and then fix all the errors and make sure it is working properly. Once you are sure you have everything exactly as you want it, you will take a copy of your development site and upload it to over live site, overwriting the live version with the most recent version you developed.
Install and Activate AMP for WordPress
When you activate the plugin AMP for WordPress, you are going to want to go to the settings page and go through all the various settings. You can get to these settings by going to the left of your WordPress dashboard and scrolling down to “AMP” (as shown below).
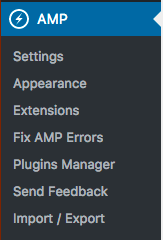
The main two areas you are going to want to focus on are “Settings” and “Appearance” tabs.If we go into Settings, we are going to see a lot of options. I’m not going to cover all of them but will cover the most important ones.
In Settings:
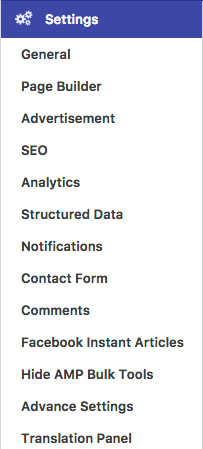
General: This is where you can upload a custom logo for AMP (which I recommend you do), as well as create a custom AMP for the home page. I would recommend taking the time to do this, as you can create a quicker mobile experience, and later will have the option to direct all of your mobile traffic to AMP. This is also where you can turn on AMP for all of your pages when you want to activate AMP.
Page Builder: If you want to build AMP landing pages, then you are going to want to turn this option on. Please refer to AMP for WP for more information on how their page builder works.
Advertisement: One of the reasons we want to use AMP is for a faster experience, but if we make money with ads, we don’t want to remove them from our AMP.Go to this section in order to set up your advertisements on AMP.
SEO: One of the reasons you are updating to AMP should be because of search results. This setting is a must!
You have a couple of options here. You are going to want to turn on the top “Meta Description” if you aren’t using an SEO plugin for WordPress, so meta descriptions are automatically taken from your content.I personally use Yoast, which means I would turn on the options under “Yoast SEO Options” so that information is pulled from the settings I have set with this plugin.
There are advanced settings for index/noindex certain pages for AMP in this section as well.
Analytics: Here you can set up your Google Analytics & Tag Manager for AMP.
Structured Data: If you have a logo you want to use for Google Structured Data or a unique image placeholder for post images, you can upload those here.
Notifications: According to EU regulations, you need to notify users that you collect cookies. You can enable this notification on AMP here, or if you aren’t in the EU and want to notify your users of something else, you can do that instead.
Advanced Settings: If you want to push all mobile traffic to AMP in order to improve user experience with a faster website, you can do so under the “Advanced Settings” tab.
The rest of the options in the “Settings” tab are optional and/or self-explanatory. I recommend you go through all of the tabs and set up the various settings according to your needs.
The “Appearance” tab has some important settings you are going to want to implement before moving your site live. In “Appearance” you can find:
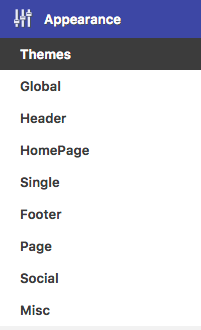
Themes: There are 3 themes you can choose from, or if you are a more advanced user, you can create your own theme as well. This is going to give the overall look of your AMP.
Header: This is important if you want to add menus to your website’s AMP.Make sure “Navigation Menu in AMP” is turned on.
Single: This gives you a lot of options for AMP that you are going to want to look at and decide if you want it for your website.This includes sticky social icons, previous next navigation, and more. It is essential you go through these settings.
Social: If you want to set up social sharing in AMP (and I recommend you do), you will do that in this section.For Facebook you will need to create a Facebook app id, the rest of the social settings are not as complicated.
Again, these are what I found to be the most necessary settings to go through when you are setting up AMP. However, it is highly recommended to take the time to go through all the settings of AMP for WP as well as the documentation.Once you feel that you have set up everything the way you want it, the next step is to validate your accelerated mobile pages.
Validate Your Accelerated Mobile Pages
Once you have the AMP for WordPress plugin set up correctly, you are going to need to check every page to make sure AMP is running optimally, according to Google.Here are a few ways you can do that.
AMP Validator by AMP Project
There are two ways you can validate your AMP pages.One is the simple AMP validator provided by the AMP Project.Here, simply enter the URL you would like to validate, and it will show you whether it has passed or fail, as you can see in the screenshot below.

Of course, this can be very time consuming if you have a very large website, as you will have to copy and paste each AMP URL into the validator separately in order to see if it passes.
SEMrush’s Site Audit
Recently we announced at SEMrush that our Site Audit now supports AMP, and you can choose to crawl your AMP first.This is a great way to validate your AMP all at once, which will save you a lot of time.
Our AMP audit has 40 different checks, which are grouped into 3 categories: AMP HTML issues, style and layout issues, and template issues.
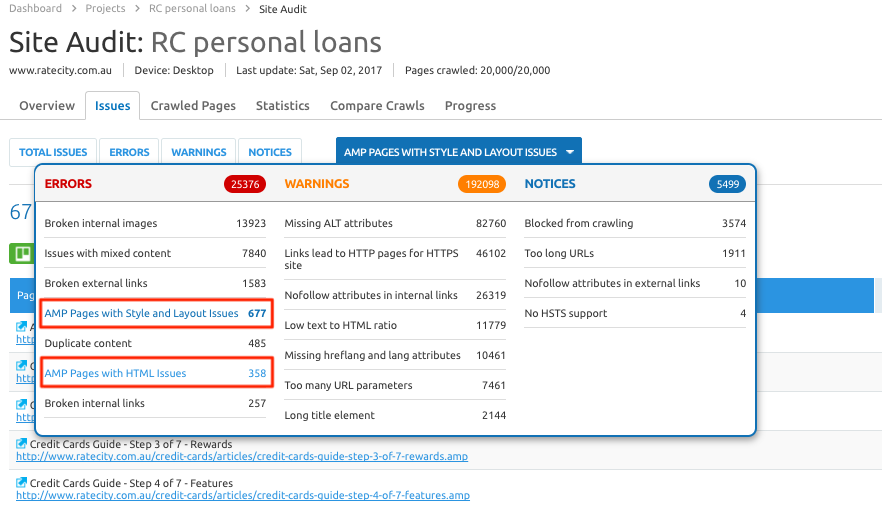
Currently, we only offer AMP site audit information for Business accounts, but it is well worth it if you have a large site.
Google Search Console
Checking your AMP in Google Search Console is a smart thing to do anyway.This is Google notifying you of any issues that they are having crawling your pages. The only issue is you do have to wait until Google crawls your site before you can see these errors.
Simply go to “Search Appearance” and then “Accelerated Mobile Pages” once you are logged into your Google Search Console in order to see all the AMP’s issue that Google’s bot has discovered.
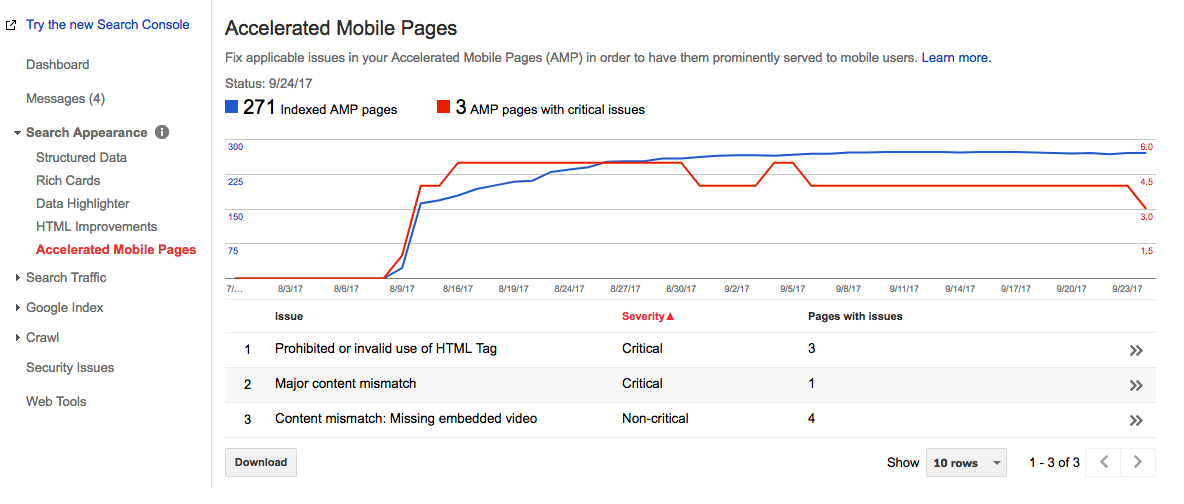
Once your AMP is validated, if you decided to clone your site, you can go ahead and move it to the live version.Then sit back, relax, and watch your mobile rankings potentially soar with the speed increase and improved user experience.
Have you updated your WordPress website to include AMP? Have you seen an increase in your mobile rankings or not?
Innovative SEO services
SEO is a patience game; no secret there. We`ll work with you to develop a Search strategy focused on producing increased traffic rankings in as early as 3-months.
A proven Allinclusive. SEO services for measuring, executing, and optimizing for Search Engine success. We say what we do and do what we say.
Our company as Semrush Agency Partner has designed a search engine optimization service that is both ethical and result-driven. We use the latest tools, strategies, and trends to help you move up in the search engines for the right keywords to get noticed by the right audience.
Today, you can schedule a Discovery call with us about your company needs.
Source:


